











Blackheart's Bay
Blackheart's Bay is a three-lane map with no fixed objective timer: coins are always in play, camps never switch off and the team that controls the middle-bottom area around Blackheart controls the game. Treasure Chests arrive first at 1:30 and then roughly every 3 minutes, growing from one chest to two and eventually three per spawn. Every payment sends 12 cannonballs at enemy structures, so the map rewards fast camp clearers, high-tickrate damage to open chests, global presence and split-pushers over pure teamfight. Fights are only worth taking when the enemy is about to pay, is on the Boss, or is carrying far more coins than you.
- Rotas
- 3 rotas
- Duração típica
- ~22 min
- Primeiro objetivo
- First at 1:30
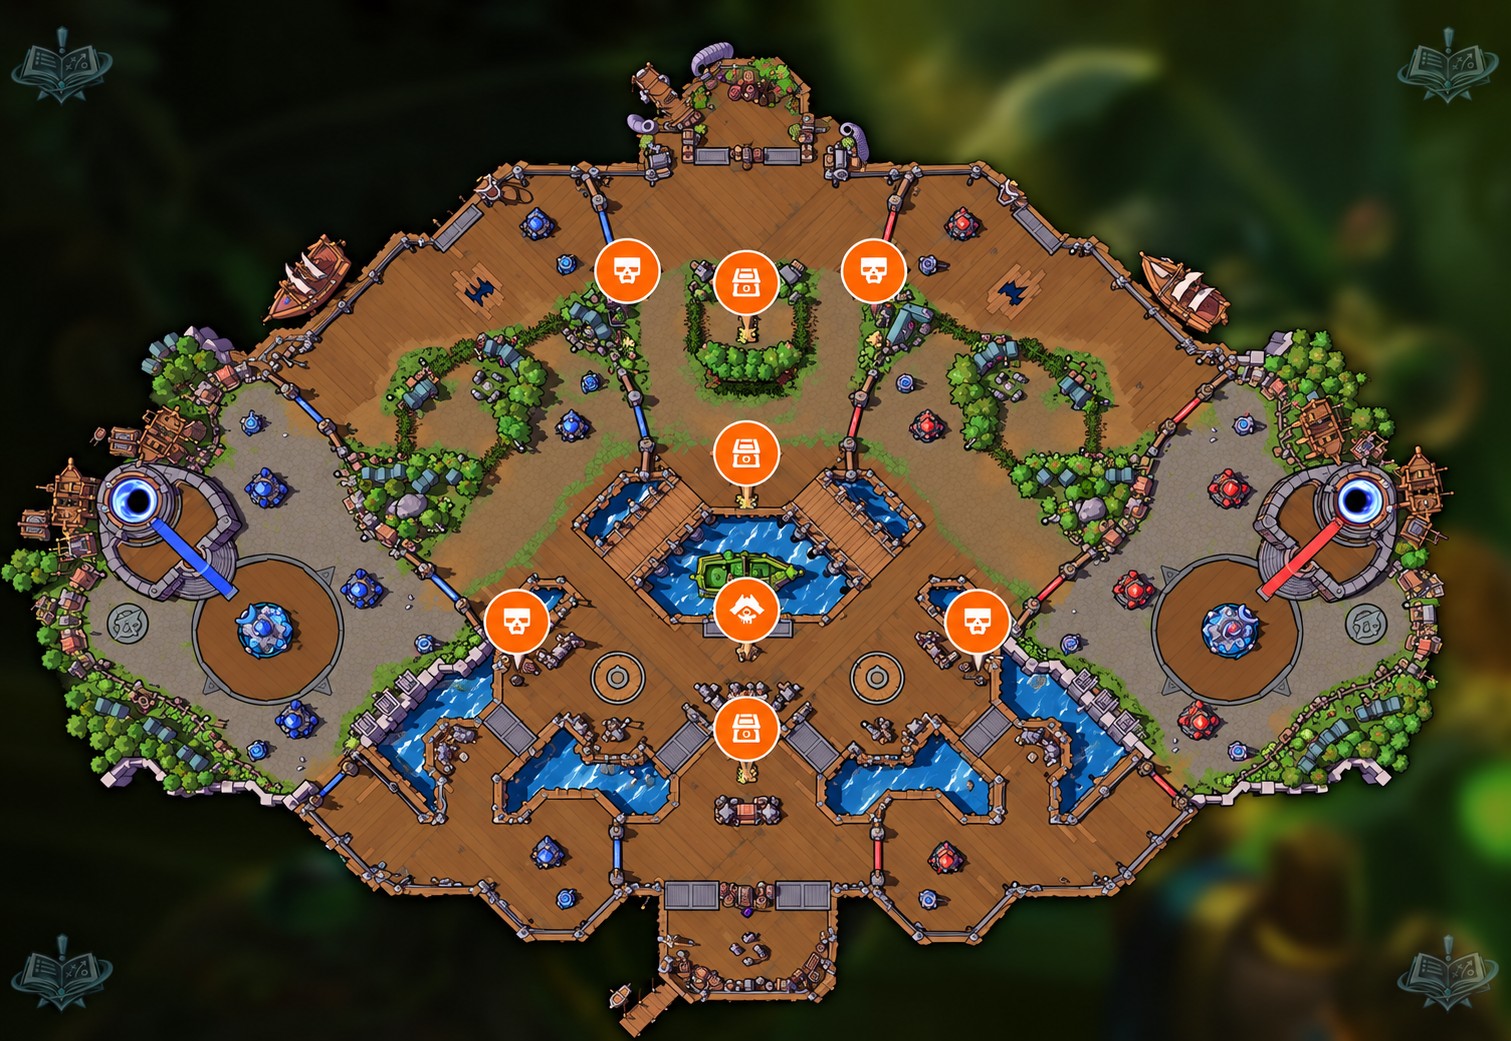
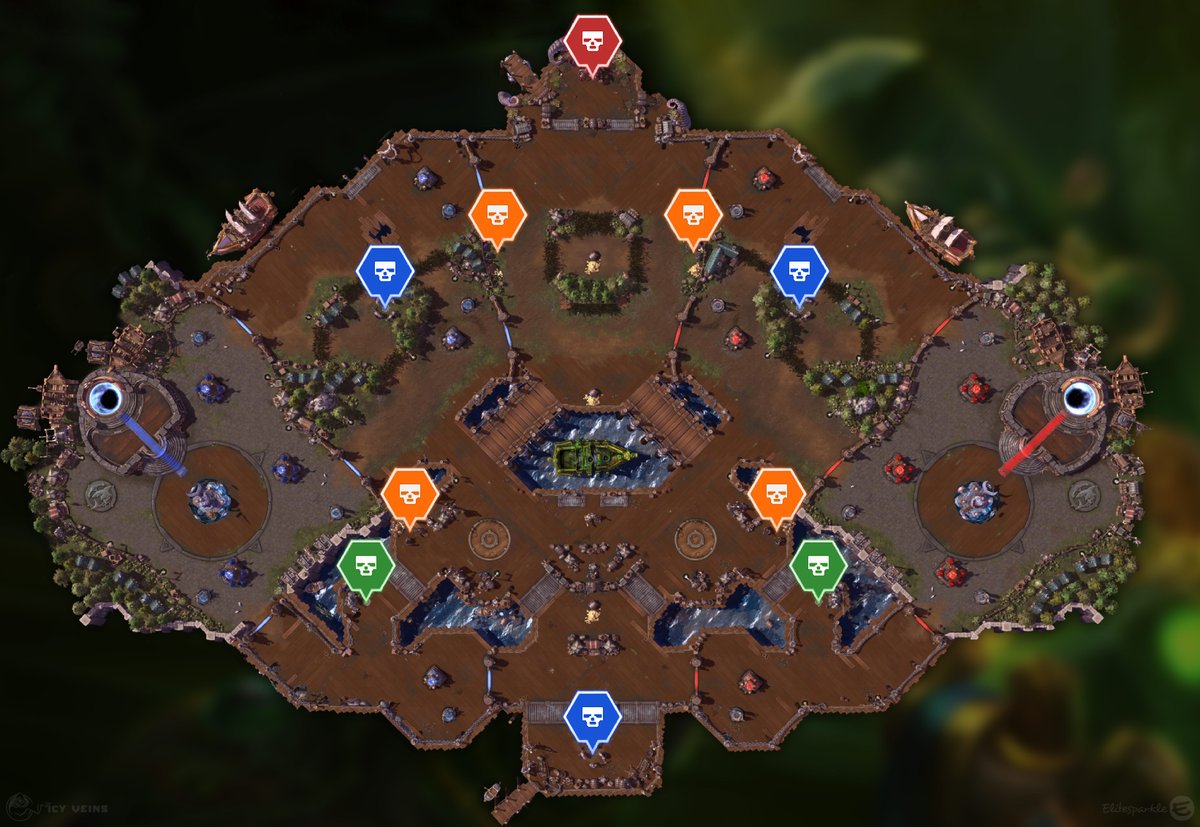
Imagem do campo de batalha: Icy Veins. Objetivos marcados sobre o mapa do jogo.
Objetivos


Treasure Chests
First at 1:30. Then 3:00 after the chests are destroyed, paused while cannonballs are being fired (in practice around 4:30–5:00 and every 4:00–4:30 after that).Each chest holds 5 doubloons and drops them as it is hit, so anyone who walks over them collects. The first spawn is always a single chest near the top lane; the next three spawns bring two chests each, and from then on there are three per spawn near the top, middle and bottom lanes. Heroes who hit many times in a couple of seconds open them fastest.
Doubloons
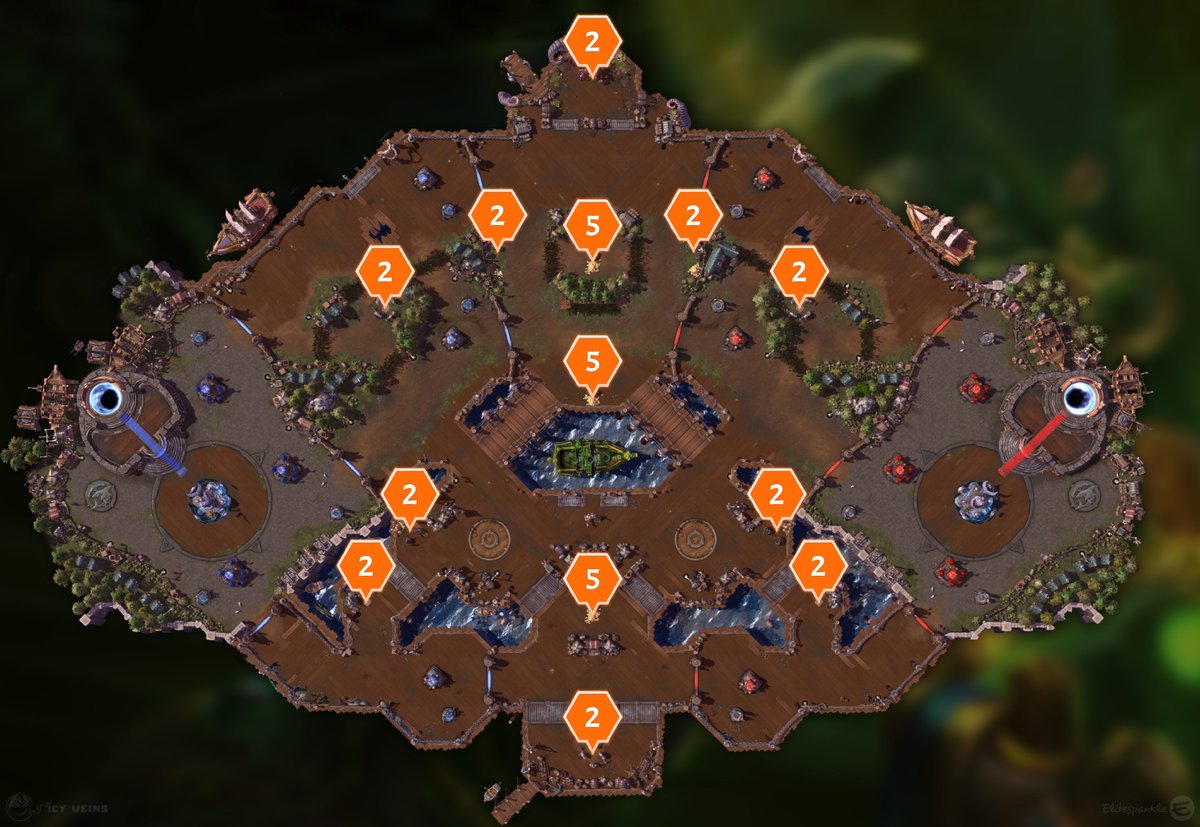
First sources at 0:30 (Doubloon Camps and mercenary camps); chests from 1:30.Chests give 5 coins, Doubloon Camps (two Skeletal Pirates) give 2 and every Siege, Bruiser and Boss camp gives 2 on top of its push. A hero who dies drops half their coins (rounded down) on the ground, where they never expire and the enemy can grab them. Press Tab to see which enemy carries the most.
Paying Blackheart
Available from the start; the first payment costs 8 doubloons, then 10, 12 and so on for your team. You can pay again as soon as a bombardment ends.Channel 5 seconds next to Blackheart in the middle of the map; damage interrupts it. A payment fires 12 cannonballs over 40 seconds, each dealing 3,000 damage to a structure and 375 splash around the impact, with Keeps and the core taking 20% less. Cannons hit the top lane first, then bottom, then middle, Forts before Keeps, and only target a Fort or Keep once its towers and gate are down; the core is only hit when everything else is gone.
Plano de partida
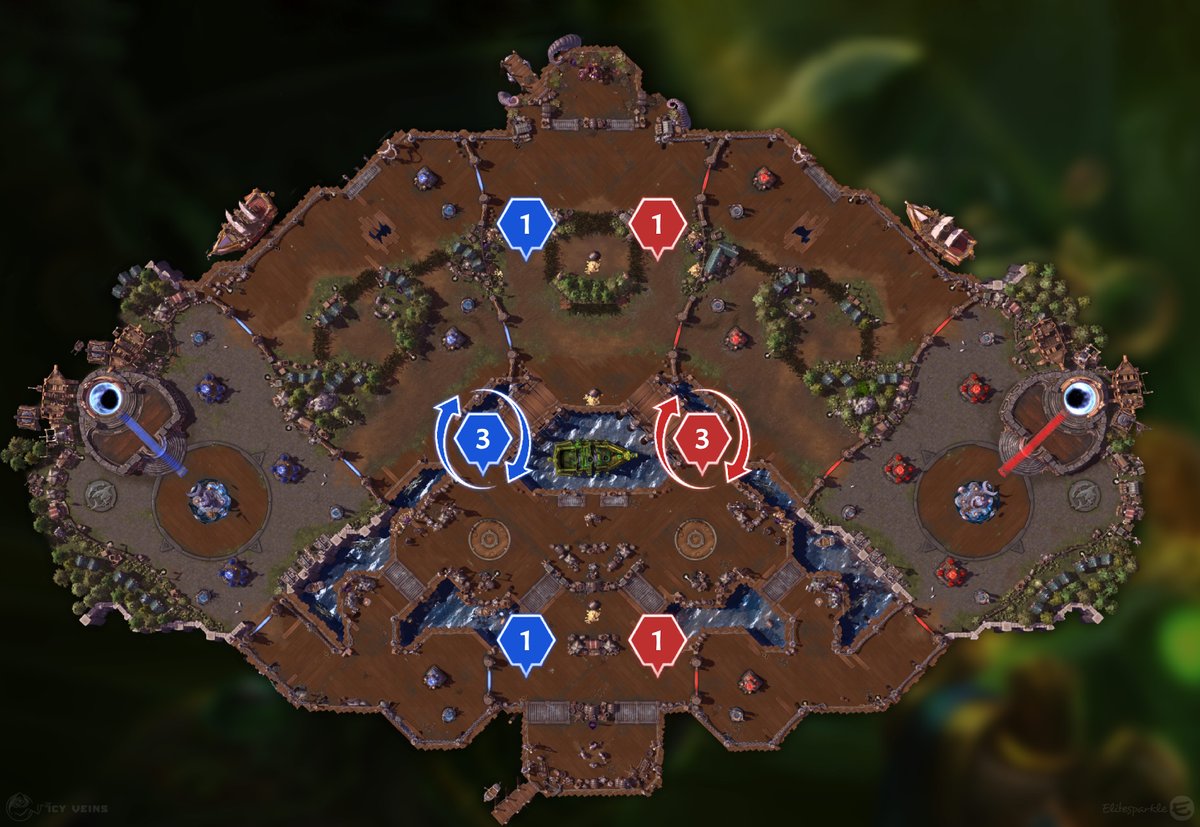
Lane assignments
The usual formation is 1-3-1 with a twist: one offlaner double-soaks top and middle, three heroes farm coins from Doubloon Camps and mercenary camps, and one hero holds the bottom lane. The alternative is 4-1: four heroes rotate between middle and top while the offlaner holds bottom. In both cases the coin group needs a fast camp clearer and mobility, because it will be carrying most of the team's doubloons and must survive a gank. Your offlaner should be someone who can hold two lanes of minions alone, since the top-middle area is where most experience sits unattended.
- 1-3-1: offlaner double-soaks top and middle; three coin farmers rotate through the camps; one anchor holds bottom near Blackheart.
- 4-1: four rotate middle and top; the offlaner holds bottom.
- Give the coin group a bruiser or double bruiser who can solo camps and escape with the loot.
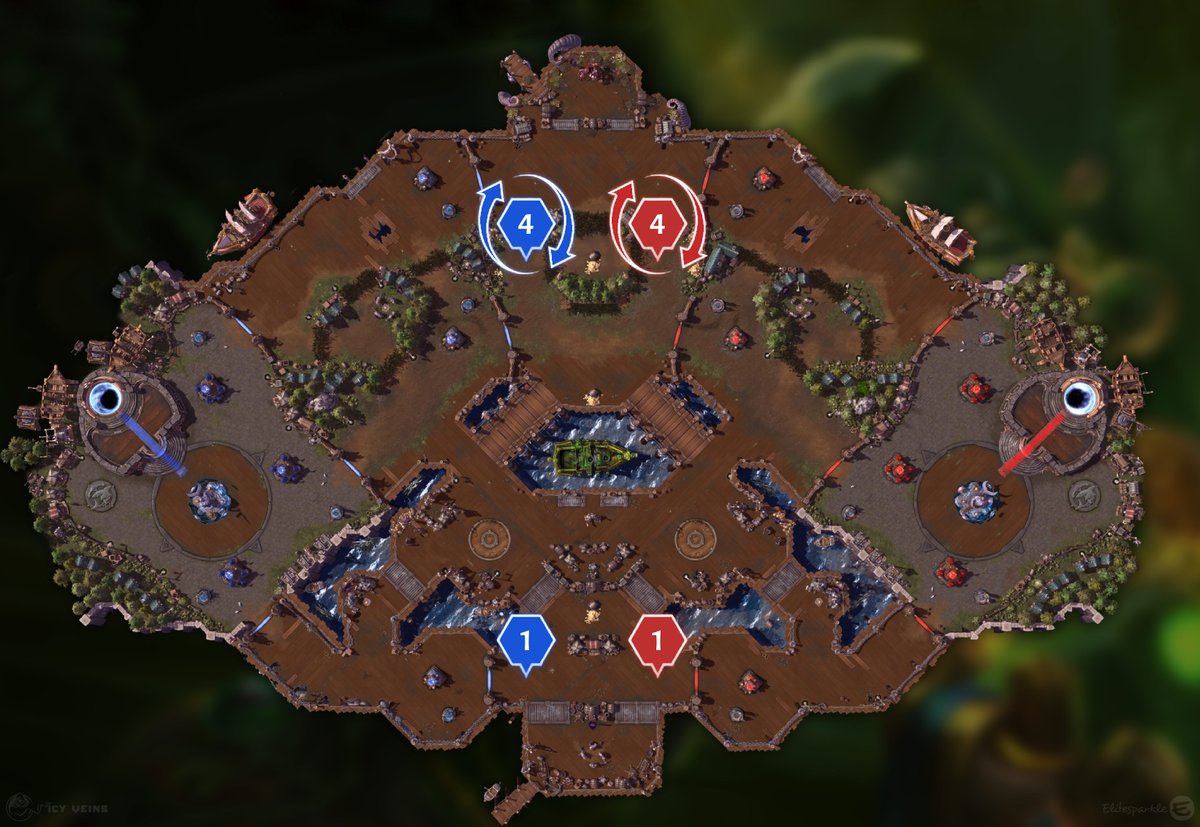
Early game
Coins matter from the first minute, so the fountain can be used on cooldown instead of saved. At 0:30 start your Siege Camp near the bottom lane and capture it around 0:45, 15 seconds after a wave spawns, so the giants walk in behind your minions; then take the Doubloon Camp next to it for 2 more coins. Just before 1:30 send several heroes toward the top lane, where the first and only chest of that phase always spawns, with one hero ready to scoop the coins as they fall. At 2:00 clear your Bruiser Camp and capture it near 2:35, 5 seconds after a wave, then the nearby Doubloon Camp. By then you should have 8 coins: pay them the moment the enemy is not in a position to interrupt, ideally while they are busy elsewhere.
- 0:30: Siege Camp (capture at 0:45), then the adjacent Doubloon Camp.
- 1:25: rotate toward top for the single first chest; bring a high-tickrate hero to open it fast.
- 2:00: Bruiser Camp (capture at 2:35), then the other Doubloon Camp; you now have enough to pay.
- Before the first payment, knock down one tower in the enemy top lane: the first bombardment nearly kills two towers, a gate and a Fort, and that tower is the difference.
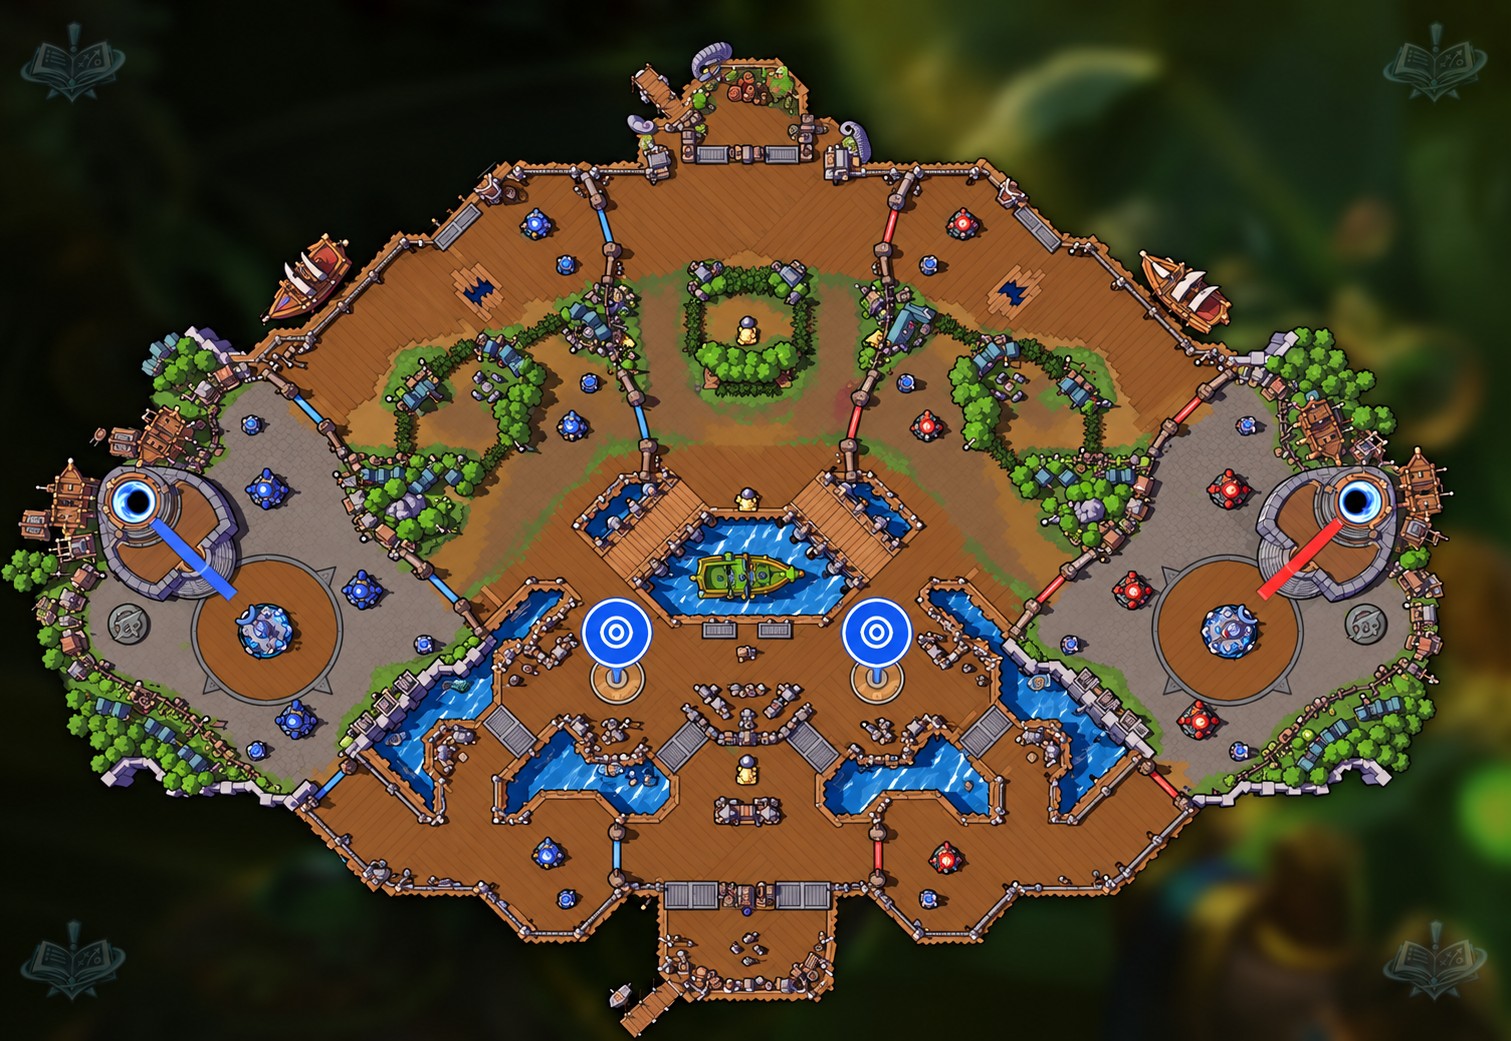
Playing the objective
Chest fights are about damage on the chest, not on heroes: assign your fastest tickrate hero to hit it and someone mobile to collect, and let the rest zone. Payments are the dangerous moment, so pay right after a won fight, while the enemy is committed to a chest or Boss on the far side, or when Tab shows their carriers are dead. Protect the channeler with bodies; a single hit resets the 5-second channel. Use each bombardment's 40 seconds to take camps and pressure side lanes, which sets up the next payment. When the enemy is the one about to pay, that is one of the few fights worth forcing: kill the carrier when no teammate of theirs can grab the dropped coins.
- Fight only when the enemy has far more coins and you have the advantage, or when they are making a game-winning play (paying, Boss with your top Keep down, going core).
- Grab the two watchtowers between middle and bottom only while you are already there: they reveal the whole approach to Blackheart and reset after 45 seconds empty.
- Never contest an enemy-held watchtower alone without mobility: staying alive beats vision.
Mercenary camps
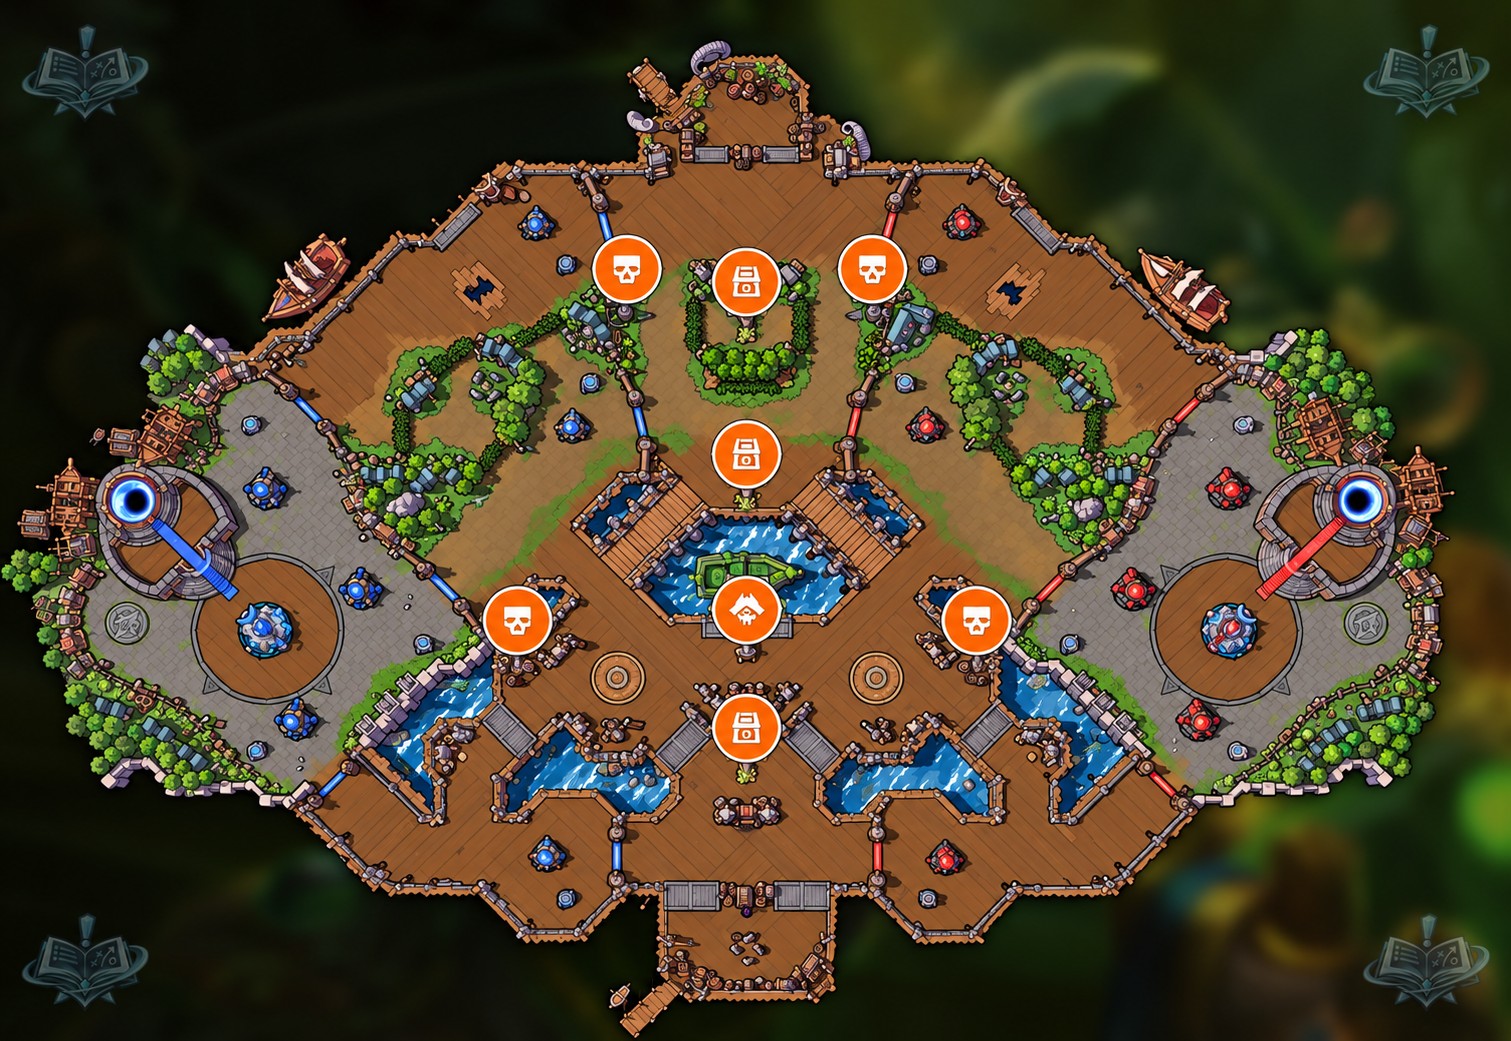
Blackheart's Bay has ten camps and none of them ever switches off, not during chests nor during a bombardment. Every camp except the Doubloon Camps pushes a lane and also pays 2 coins, so a camp here is worth taking even when the push itself is weak. The Boss is a Grave Golem in the top lane, and after about 10:00 it doubles as a distraction: start it to pull the enemy up, then pay at Blackheart while they react.
- Doubloon camp (2 Skeletal Pirates), four in total between the lanes: 0:30, respawns 2:30 after capture. 2 coins, no push; any hero can solo them, so take them on cooldown.
- Siege camp (2 Siege Giants), two in the bottom lane: 0:30, respawns 3:00 after capture. 2 coins plus giants that outrange towers and deal double damage to structures; dodge their rocks to clear for free.
- Bruiser camp (3 Knights + 1 Wizard), two top and one bottom: 0:30, respawns 4:00 after capture. 2 coins; the Wizard's spell armor field protects the wave, so do not fight into it.
- Boss camp (Grave Golem), top lane: 5:00, respawns 5:00 after capture. 2 coins; Mega Smash stuns in melee every 10 seconds and Binding Roots root every 15. Immune to bribe.
Late game and win conditions
Three win conditions exist here: the bombardment, a Boss push and split-push. Payments get pricier (8, 10, 12 and so on) and chests spawn three at a time, so the late game is about denying the enemy's turn-in while landing yours. Cannons only reach a Keep once its towers and gate are gone, and only the core once every other structure has fallen, so clear those first or a payment is wasted on gates. A bombardment on a full-health, full-shield core leaves it at about 19%: commit as many heroes as possible right after to finish it before the shield regenerates. From about 10:00, the Grave Golem is your lever: push with it or use it to pull the enemy away from Blackheart.
- Win conditions: bombardment, Boss push, split-push.
- The core cannon fires every 4 seconds at two nearby heroes for 5% max health, a 70% slow for 1.5 seconds and a knockback: dive it only with the bombardment landing.
- Cannon damage never scales (3,000 per hit), so late Keeps survive a volley; combine payments with heroes or mercenaries on the same lane.
O que buscar no draft
O que buscar no draft
- Prefer fast camp clearers and a double bruiser setup: ten camps that all pay coins reward it.
- Prefer high-tickrate damage to open chests in seconds (Tychus, Tracer, Lunara, Sylvanas, Kel'Thuzad, Azmodan and similar).
- Prefer an offlaner who can double-soak top and middle alone.
- Prefer global presence, split-pushers and vision tools; the map is wide and the fights are optional.
- Prefer point control for the Boss: a Grave Golem after 10:00 is a win condition here.
- Avoid abilities that rely on impassable terrain and quests that stack on heroes: fights are rare and the terrain is open.
Erros típicos
- Walking to Blackheart with 15 coins and no teammates: dying there hands half of them to the enemy.
- Fighting for the sake of it while the enemy quietly farms Doubloon Camps and pays without contest.
- Paying while the enemy's towers are still up, so the cannons spend themselves on a gate instead of a Fort.
- Hoarding coins on one hero instead of paying every time you reach 5 or more.
- Contesting an enemy watchtower alone with no escape and dying for a few seconds of vision.
Dicas
- 1Payment costs 8 coins, plus 2 for every previous payment by your team; the channel is 5 seconds and any damage cancels it.
- 2Chest count grows: 1 chest (always top) the first time, then 2 chests for three spawns, then 3 for the rest of the game.
- 3Dropped coins never disappear: after a kill, walk over the pile before the enemy respawns.
- 4Press Tab to see which enemy carries the most coins, then deny that hero the dock or kill them away from teammates.
- 5Cannons hit top, then bottom, then middle, Forts before Keeps, and skip any Fort whose towers and gate still stand.
- 6The healing fountain can be used on cooldown here; there is no timed objective to save it for.
- 7Doubloon Camps respawn 2:30 after capture: taking all four on cooldown is a steady 8 coins per cycle.
- 8During a bombardment the chest timer pauses: use those 40 seconds for camps, not for sitting under the cannons.