












Sierra · Damage
Sierra abilities, perks and Stadium powers
Mais guias de Sierra
Este guia é montado pelo site com dados de partidas e do próprio jogo: ninguém o escreveu à mão. Se houver guias oficiais ou da comunidade, eles aparecem ao lado.
Introdução
Sierra is a recon damage hero in Overwatch with 250 health. In competitive this season (PC, Americas, Europe and Asia averaged) it wins 49.3% of its games, is picked by 13.3% of teams and banned in 12.3% of matches: tier C on our ladder. Sierra has 4 perks and 0 Stadium powers; below, each one is listed under the ability it changes.
Pontos fracos
- None of its abilities is described as a dash, jump or teleport: position before the fight, not during it.
Cola de builds
Escolha a build de acordo com o que você quer fazer na partida.
- Sierra · recommended perksEquilibradoRecomendadaOne minor and one major perk, chosen by what each one's text adds to a damage hero. Blizzard doesn't publish how often each perk is picked, so this is a reading of the perks, not a pick rate.
- Sierra · alternative perksUtilidadeSituacionalThe other option of each perk level. Perks are chosen during the match, so switch to these when the enemy composition or the map asks for what they do.
Builds
Sierra · recommended perks
Quando usar
One minor and one major perk, chosen by what each one's text adds to a damage hero. Blizzard doesn't publish how often each perk is picked, so this is a reading of the perks, not a pick rate.
Vantagem menor
 Voo MáximoAumenta em 25% o alcance do voo e do arpéu do Drone Âncora.
 Gatilho FirmeA dispersão de projéteis do Rifle Hélix se ajusta 70% mais rápido e se expande 30% mais devagar.
Picked for more utility: Helix Rifle's bullet spread tightens 70% faster and widens 30% slower.
Vantagem maior
 Drones MedicinaisDrones Âncora carregam um kit médico que pode curar Sierra.
 Na MiraAcertar um inimigo com o Disparo Perseguidor aumenta em 20% sua velocidade de ataque por 2 s.
Picked for more damage: Hitting an enemy with Tracking Shot increases your attack speed by 20% for 2 seconds.
Sierra · alternative perks
Quando usar
The other option of each perk level. Perks are chosen during the match, so switch to these when the enemy composition or the map asks for what they do.
Vantagem menor
Voo MáximoAumenta em 25% o alcance do voo e do arpéu do Drone Âncora.Gatilho FirmeA dispersão de projéteis do Rifle Hélix se ajusta 70% mais rápido e se expande 30% mais devagar.When the situation calls for it: Increase Anchor Drone flight and grapple ranges by 25%.
Vantagem maior
Drones MedicinaisDrones Âncora carregam um kit médico que pode curar Sierra.Na MiraAcertar um inimigo com o Disparo Perseguidor aumenta em 20% sua velocidade de ataque por 2 s.When the situation calls for it: Anchor Drones hold a medkit that can heal Sierra.
Habilidades
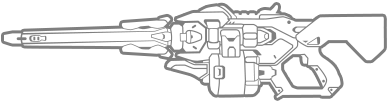 LMBRifle HélixArma de ataque automática. Dispara em um padrão espiral, aumentando a precisão com disparos constantes.Key: primary fire. Perks: Tight Grip
 RMBDisparo Perseguidor10sMarca um inimigo. Disparos com o Rifle Hélix perseguem inimigos marcados automaticamente.Key: secondary fire · cooldown 10 s. Perks: Locked In
 ECarga de Tremor7sLança uma carga que cria uma onda de choque no impacto.Key: E · cooldown 7 s
 ShiftDrone Âncora11sLança um Drone Âncora. Reative para usar o arpéu nele.Key: Shift · cooldown 11 s. Perks: Full Flight, Medi-Drone
 QVanguarda ExplosivaSupremaLança um drone que voa para frente e dispara explosivos para baixo.Key: Q · ultimate
Estratégia
1Helix Rifle
primary fire · Helix Rifle: Automatic assault weapon. Shoots in a spiral pattern, gaining accuracy with sustained fire.
- Minor perk · Tight Grip: Helix Rifle's bullet spread tightens 70% faster and widens 30% slower.
2Tracking Shot
secondary fire · Tracking Shot · 10 s: Marks an enemy. Helix Rifle shots automatically track marked enemies.
- Major perk · Locked In: Hitting an enemy with Tracking Shot increases your attack speed by 20% for 2 seconds.
3Tremor Charge
E · Tremor Charge · 7 s: Throw a charge that creates a shockwave on impact.
4Anchor Drone
Shift · Anchor Drone · 11 s: Launch an Anchor Drone. Reactivate to grapple to it.
- Minor perk · Full Flight: Increase Anchor Drone flight and grapple ranges by 25%.
- Major perk · Medi-Drone: Anchor Drones hold a medkit that can heal Sierra.
5Trailblazer
Q · Trailblazer · ultimate: Deploy a drone that flies forward and drops explosives.
6Perks
During each match you unlock a minor perk and, later, a major perk: one of two options each time. ★ marks this guide's pick.
- Full Flight: Increase Anchor Drone flight and grapple ranges by 25%.
- ★ Tight Grip: Helix Rifle's bullet spread tightens 70% faster and widens 30% slower.
- ★ Locked In: Hitting an enemy with Tracking Shot increases your attack speed by 20% for 2 seconds.
- Medi-Drone: Anchor Drones hold a medkit that can heal Sierra.
Dicas
- Trailblazer (Q) is your ultimate: plan it with your team's ultimates instead of using it as soon as it's ready.
Confrontos
Combina bem com
Both do better than their average on the same maps, such as Dorado, Circuit Royal and Route 66: a good pairing when the map suits them.
Both do better than their average on the same maps, such as Circuit Royal, Havana and Junkertown: a good pairing when the map suits them.
Both do better than their average on the same maps, such as Havana, Circuit Royal and Junkertown: a good pairing when the map suits them.
Both do better than their average on the same maps, such as Havana, Circuit Royal and Junkertown: a good pairing when the map suits them.




Mudanças
- Guide created for patch Season 4.
Ele te ajudou?
Seu voto ajuda outros jogadores a encontrar os melhores guias.