











Towers of Doom
Towers of Doom is a three-lane map with one bell tower (a fort, later a keep) per lane on each side, and the only ways to hurt the enemy core are altars, sappers reaching the kill zone, the Headless Horseman and owning all six bell towers at once. Altars rise in fixed combinations from four spots (two at the top, one in the middle, one at the bottom), so the fights are spread out and you often need to be in two places at once. Destroying an enemy bell tower flips it to your side, which both raises your altar damage and lowers theirs, so structures are worth far more than kills. At 12:00 the bell towers become keeps and a one-way waygate opens from each core to the center. Teams with camp clearers, gankers, global presence and an offlaner who can double-soak win here, and the side that keeps a cool head about the core counter usually comes out ahead.
- Rotas
- 3 rotas
- Duração típica
- ~21 min
- Primeiro objetivo
- First at 3:00
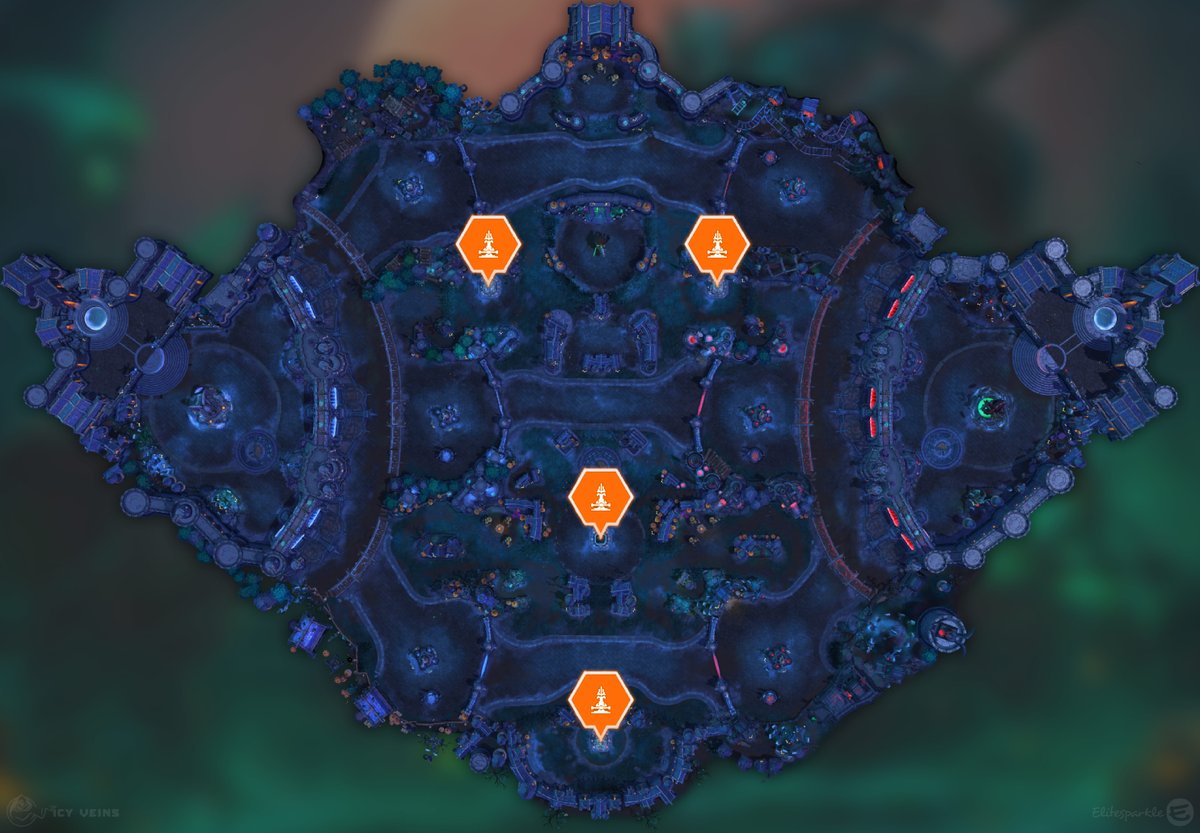
Imagem do campo de batalha: Icy Veins. Objetivos marcados sobre o mapa do jogo.
Objetivos



Altars
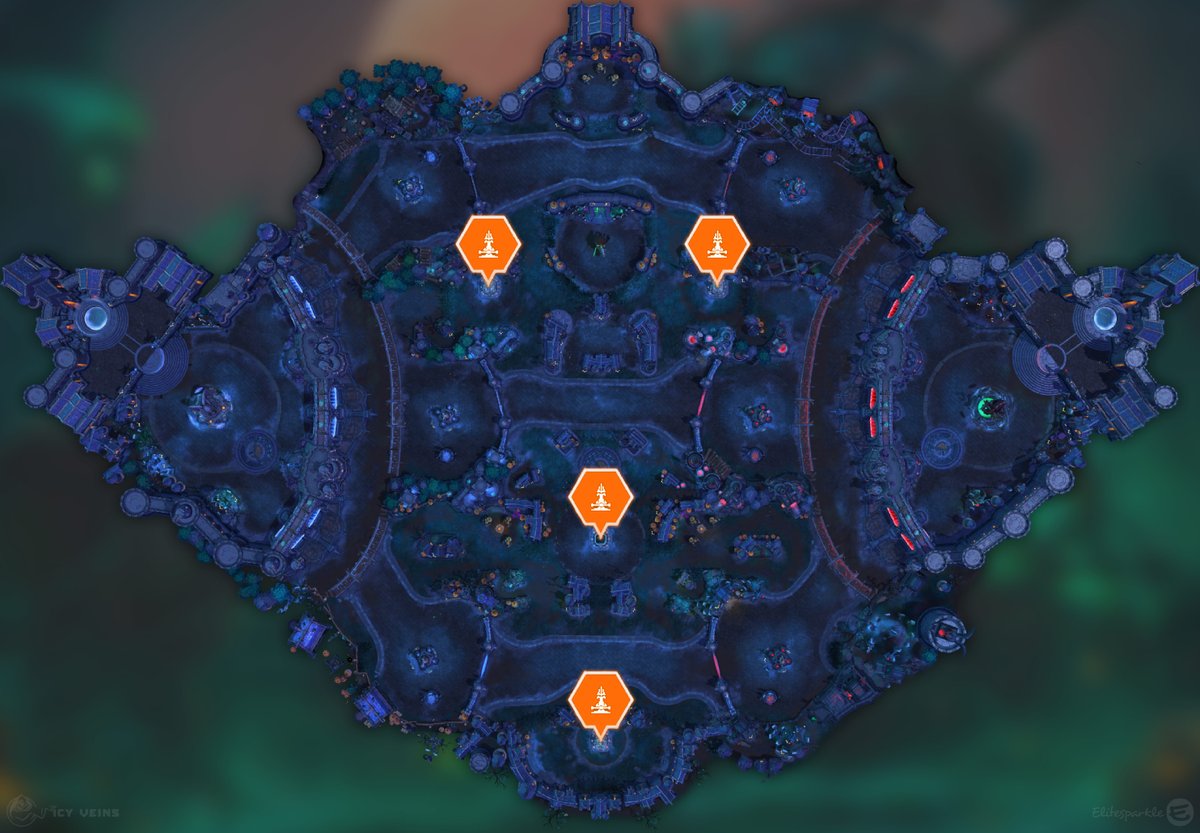
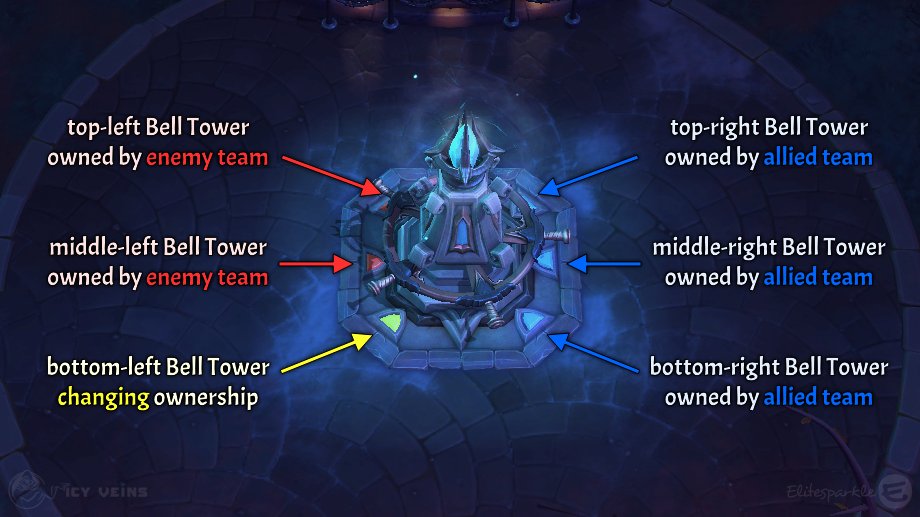
First at 3:00. Then 1:50 after all altars of the current set are captured. Capturing takes a 6-second channel and the damage lands 4 seconds later.Altars appear in one of six configurations: top-left and top-right; middle only; bottom only; middle and bottom; both top plus middle; or both top plus bottom. The two top altars always come together. The 1st and 5th sets always have three altars, the first six sets never repeat a configuration, sets seven to ten draw from the two-or-fewer options without repeats, and after that anything but the three-altar sets can appear. Track the history and you will know the 5th, 6th and 10th layouts before the minimap shows them. The lights under each altar show who owns each bell tower: blue yours, red theirs, yellow changing hands.
Bell towers and the 6-cap
First relevant from 3:00, since every capture counts your towers. Forts become keeps at about 12:00 (delayed while altars are active). A destroyed tower changes owner after 2 seconds and takes about 20 seconds to become a structure again.Bell towers are the guns: an altar does 1 damage plus 1 for each tower you hold. A tower you steal on the enemy side comes without a healing fountain; one you retake on your side has it. If you hold all six, the enemy core is bombarded automatically: the first shot lands 8 seconds after the last tower falls, six more come every 6 seconds, then one every 3 seconds, so a full 6-cap deals 9 damage inside 50 seconds and keeps going until they take a tower back.
Waygate
First opens at about 12:00, delayed while altars are active. Channel 2 seconds to travel from your core to the middle lane bush; it doesn't work in reverse.After dying or hearthing, the waygate puts you back in the center almost immediately, which makes late defensive rotations much faster. The exit is also an ambush point: several enemy heroes can pop out at once, so don't stand next to it alone.
Plano de partida
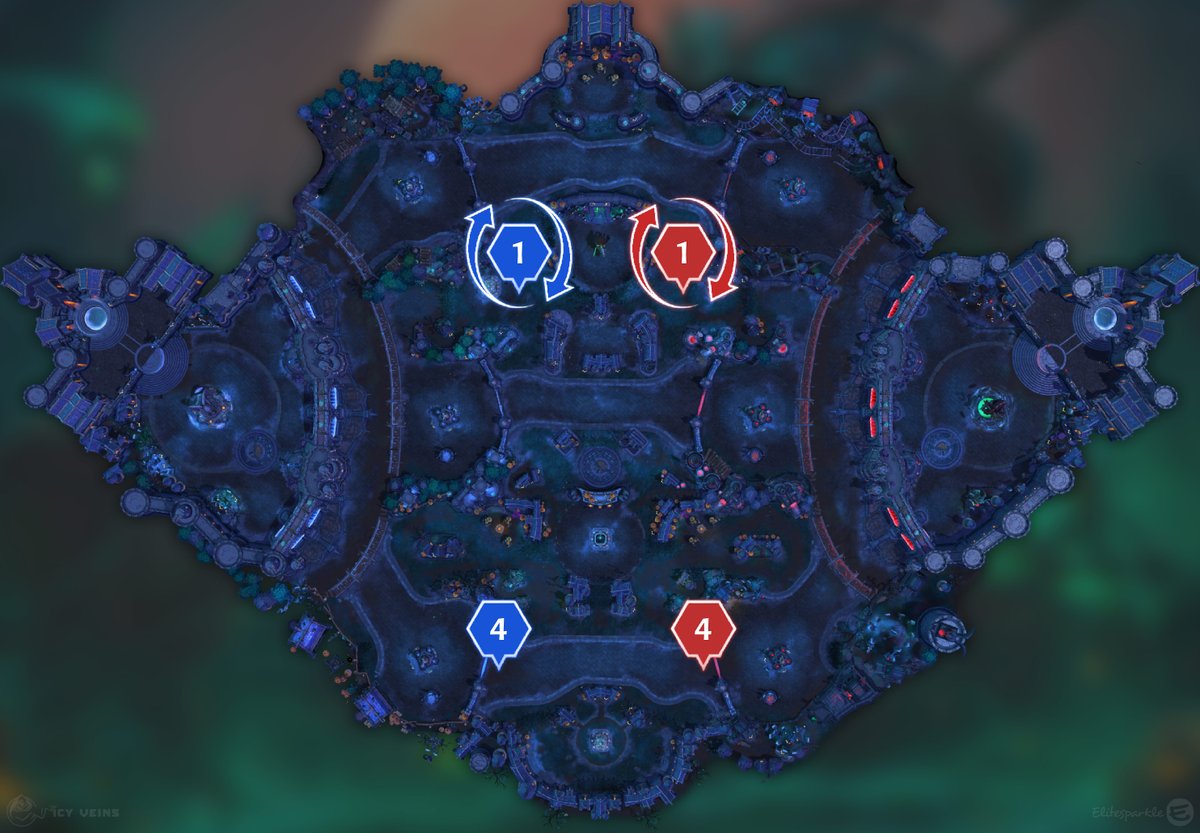
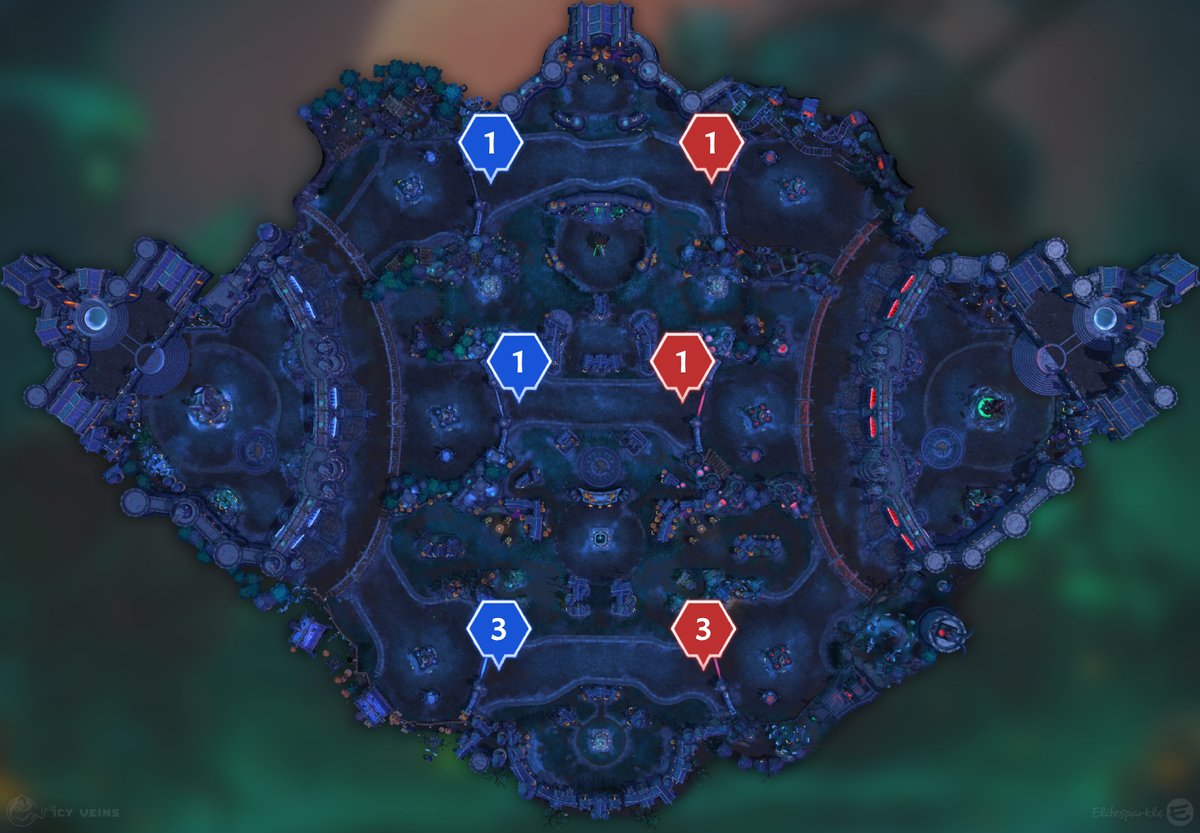
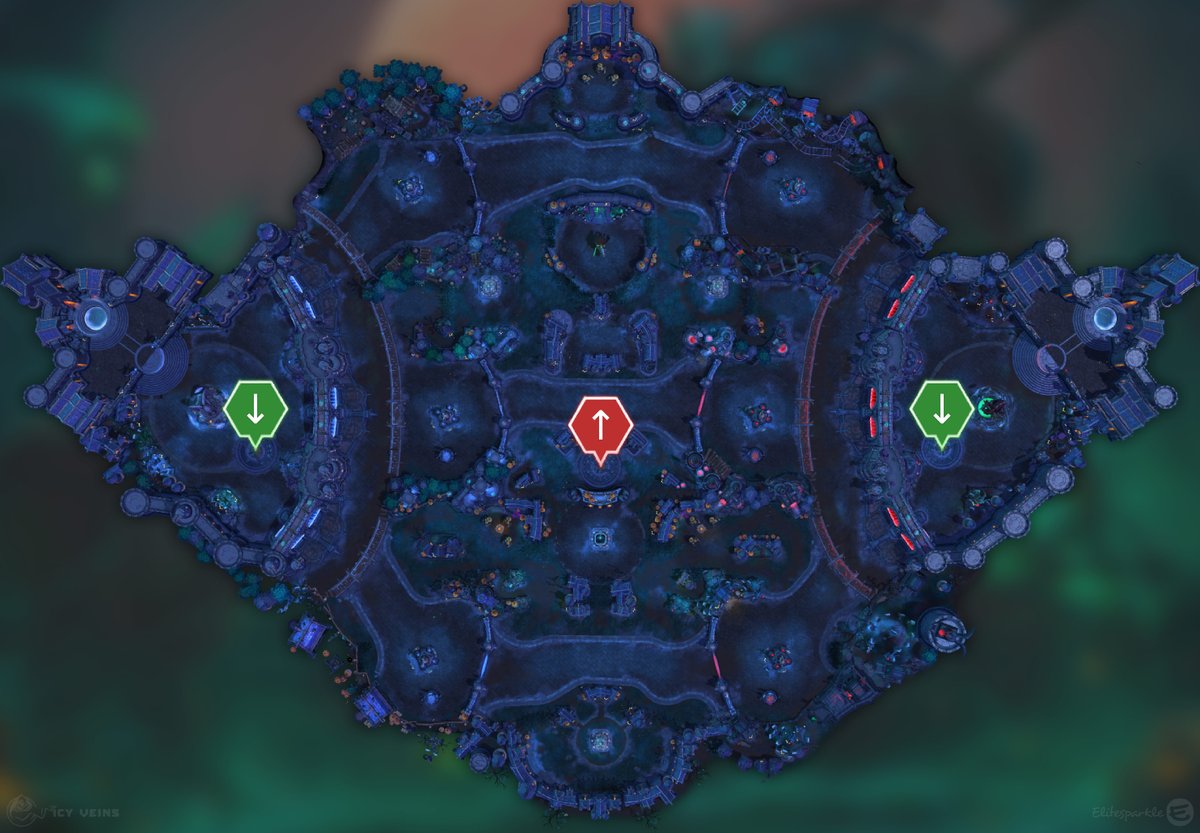
Lane assignments
The default is 1-4: an offlaner who can double-soak middle and top, and four heroes in the bottom lane, close to the bottom sapper camps and to the middle and bottom altar spots. The four-stack pressures the bottom bell tower, which is the one you most want to steal and hold. The alternative is 1-1-3: offlaner top, one hero in middle who ganks when possible, and three bottom. Whatever you run, someone has to be able to hold two lanes' worth of experience alone, and your global hero should take whichever lane is farthest from the next altar set.
- 1-4: offlaner double-soaks middle and top; four heroes bottom.
- 1-1-3: offlaner top; a ganker in middle; three bottom.
- The four-stack's job is the bottom bell tower: take it, then defend it.
Early game
Use the fountain before 1:00 so it's ready for the 3:00 altars. At 0:30 your side's sapper camp is up: clear it fast and capture it, but keep one hero in the side bush to spot an invade, because a stolen sapper camp is three free points of pressure for the enemy. Escorted all the way, three sappers are worth 1750 damage each to a structure or 1 core damage each if they reach the kill zone. At 3:00 the first set always has three altars, so have a hero near every allied and neutral altar; don't try to capture the far top altar on the enemy side, just poke whoever is channeling it. A global hero is the right pick for the top altar on your side.
- 0:30: sapper camp on your side; watch the bush for invades.
- Sappers deal 1750 to a structure or 1 core damage each in the kill zone: 3 per fully escorted camp.
- 3:00: three altars. Cover yours and the neutral one; poke the enemy-side top altar instead of taking it.
- Fountain before 1:00 so it's back for the first set.
Playing the objective
Every altar is a 6-second channel that can be poked off, so long-range damage and vision around the altar matter more than raw brawling. Before you channel, check the tower count: if a bell tower is almost down, finish it first so the altar hits harder, and if the enemy is about to take one of yours, defend it first. When altars are split, send the number of heroes each one needs and no more, and accept giving up an altar you can't reach rather than losing a fort trying. If you take the bottom bell tower, hold it through the next set; letting the enemy retake it for free right before a nearby altar hands them the damage swing. Core health is a resource: only start worrying at 10 or below, and until then use it to buy structures and position elsewhere.
- Finish a low bell tower before channeling; each tower you hold is +1 on every altar.
- Two heroes with poke stall an enemy channel indefinitely; one melee body does not.
- Lost the bottom tower and can't get it back? Take the neutral sapper camp and push middle or top instead.
- Track altar history: the 5th set is always three altars and the 6th is whatever configuration hasn't appeared yet.
Mercenary camps
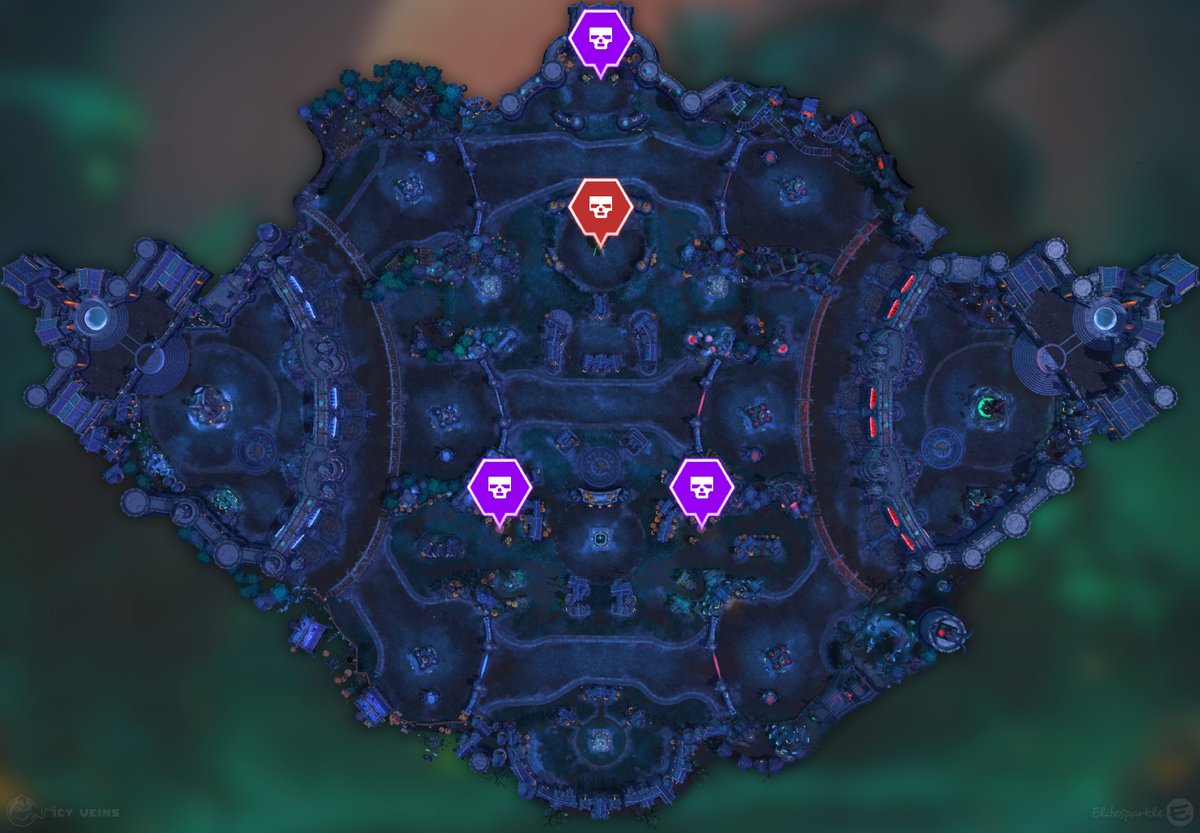
There are four camps: one sapper camp in the top lane, two sapper camps in the bottom lane and the Headless Horseman between top and middle. All camps stay active during altar phases. Sappers sprint at the first enemy structure in range and explode, dealing 1750 to it (not scaling) and 187 to nearby non-structures; stuns, silences and knockbacks briefly interrupt the charge but they try again immediately, so kill them instead. On this map they have an extra job: a sapper that enters the enemy kill zone hurls its head at the core for 1 damage no matter how many towers you own. The Horseman doesn't walk down a lane at all: once captured he vanishes and, after 5 seconds, deals 4 core damage over 2 seconds.
- Sapper camp (3 Sappers): 0:30, respawns 2:30 after capture. 1750 to structures; 1 core damage each if they reach the kill zone, so a full escort is worth 3.
- Boss camp (Headless Horseman): 5:00, respawns 5:00 after capture. Doesn't push; deals 4 core damage 5 seconds after capture. Immune to Bribe.
- Horseman's Head (6-second cooldown) drops a green pool under a hero: spread out and move when the skull starts spinning.
- Camps never turn off during altars: a sapper escort during an enemy channel splits their attention.
Late game and win conditions
Around 12:00 the bell towers become keeps with more health and more experience, and the waygate opens so dead heroes reach the center in seconds. The Horseman is the tiebreaker: don't take him for a random 4 damage while the enemy core sits at 30, but the moment either core is at 4 or less, whoever controls the boss can end the game, so keep vision on the pit and fight for him. With a big lead (at least three enemies dead), go for the 6-cap: split so that every remaining enemy bell tower falls at the same time and the bombardment finishes what altars started. Never dive into the enemy kill zone: it deals 150 (+25 per minute) every half second and strips 20 Armor per tick up to 40, and there's an invisible barrier that shoves you out. Do the reverse to them with knockbacks when they push near your core.
- Win conditions: altar damage and split-pushing bell towers; the Horseman only when a core is at 4 or less.
- 6-cap bombardment: first shot at 8 seconds, then every 6, then every 3; 9 damage in under 50 seconds.
- Kill zone damage is Physical: Armor, Evade and Parry reduce or negate it, Spell Armor does not.
- Knock enemies into your kill zone when they fight near a lost bell tower; most heroes don't survive it.
O que buscar no draft
O que buscar no draft
- Prefer an offlaner who can double-soak middle and top so four heroes can pressure the bottom bell tower.
- Prefer fast camp clearers: sapper escorts are core damage and the Horseman decides close games.
- Prefer global presence and gankers to cover split altar sets and punish lone channelers.
- Prefer long-range poke to knock enemies off a 6-second altar channel without committing.
- Prefer a strong late game; bell towers become keeps and most games are decided after 12:00.
- Avoid heroes built around backdooring the core or who fall off late: the core can't be hit, and the map rewards patience.
Erros típicos
- Channeling an altar while an almost-dead bell tower is still standing, wasting a point of damage on every capture that follows.
- Trading a fort to secure a single altar; the enemy's altars now hit harder for the rest of the game.
- Diving past the enemy gates into the kill zone or the barrier behind it and dying for nothing.
- Taking the Headless Horseman for 4 damage when nobody's core is close to zero, instead of using the time to take a bell tower.
- Standing next to the waygate exit alone after 12:00 and getting jumped by a whole team.
Dicas
- 1Each altar deals 1 damage plus 1 per fort or keep you own, landing 4 seconds after the 6-second channel.
- 2The top-left and top-right altars always spawn together; sets 1 and 5 always have three altars.
- 3A fully escorted sapper camp is worth 3 core damage; a destroyed structure takes 1750 from each sapper.
- 4The Horseman's 4 damage ignores your tower count; save him for when a core is at 4 or less.
- 5Stolen bell towers on the enemy side have no healing fountain; retaken ones on your side do.
- 6A destroyed bell tower switches owner in 2 seconds but takes about 20 seconds to become a structure you can attack again.
- 7The waygate opens around 12:00 (later if altars are active) and only goes core-to-center after a 2-second channel.
- 8Kill zone: 150 (+25 per minute) every 0.5 seconds and -20 Armor per hit up to 40; Evade and Parry negate it.