











Briar · Jungle
Briar Guide
Mais guias de Briar
Este guia é montado pelo site com dados de partidas e do próprio jogo: ninguém o escreveu à mão. Se houver guias oficiais ou da comunidade, eles aparecem ao lado.
Introdução
Briar belongs to Riot's Fighter and Assassin classes and is played mainly as Jungle (100% of the public matches we measured). It fights in melee range and uses fury. In this guide you play it as Jungle: your job is to clear camps efficiently, gank the lanes that can win and control dragons, grubs and Baron. The kit brings crowd control (stun) with Head Rush, mobility with Head Rush and sustain with Crimson Curse. Its ultimate is Certain Death. Riot rates it 9/10 in attack, 3/10 in magic, 5/10 in defense and 3/10 in difficulty.
Pontos fortes
- High physical damage: Riot rates it 9/10 in attack.
- Crowd control: Head Rush applies a stun to set up kills.
- Mobility: Head Rush lets you reposition, engage or escape.
- Sustain from Crimson Curse.
Pontos fracos
- Falls behind if the early ganks fail: every wasted trip is lost farm.
- Predictable if you always play it the same way: adapt your build to the enemy team.
Cola de builds
Escolha a build de acordo com o que você quer fazer na partida.
- Standard buildEquilibradoRecomendadaThe default path: Black Cleaver, Bastionbreaker and Serylda's Grudge give the health, attack damage and on-hit effects this class relies on. Pick it when you have no reason to adapt. Built from Riot's item tags and the champion's class; Riot publishes no build statistics.
- Defensive buildDefensivoSituacionalKeeps enough damage while adding magic resist, attack damage and life steal through Mercurial Scimitar, Maw of Malmortius and Death's Dance. Choose it against dive, assassins or a lane you can't win.
Builds
Standard build
Quando usar
The default path: Black Cleaver, Bastionbreaker and Serylda's Grudge give the health, attack damage and on-hit effects this class relies on. Pick it when you have no reason to adapt. Built from Riot's item tags and the champion's class; Riot publishes no build statistics.


Por onde se joga
É escolhida antes da partida: primeiro a rota principal e depois as alternativas.
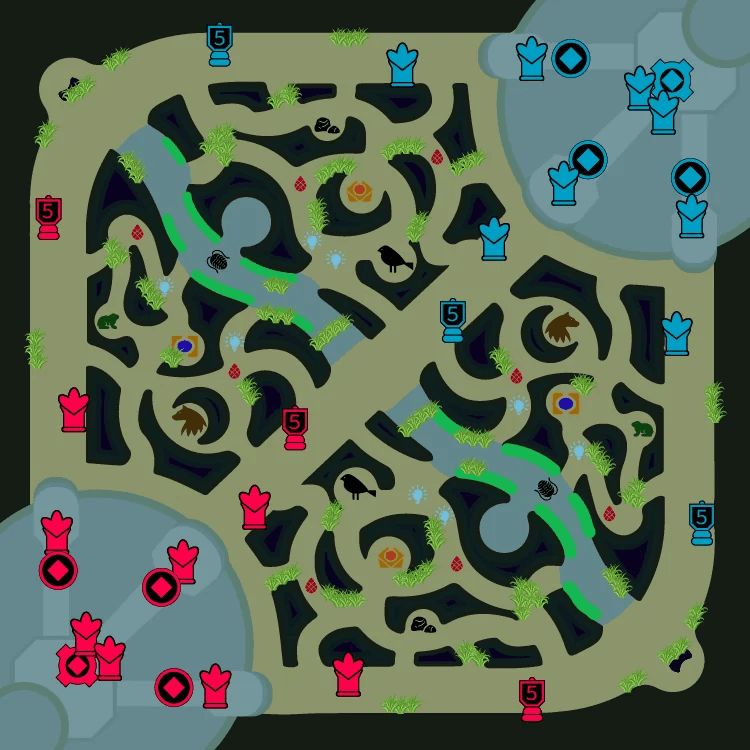
 1100 %
- SelvaPrincipal100 % das partidas
Prioridades na selva
Começa emBuff vermelho
Objetivos por prioridade
- 1Larvas do Vazio
- 2Gank no topo
- 3Arauto do Vale
- 4Caranguejo do rio
- 5Dragões
- 6Barão Nashor
- 7Atakhan
Guideline, not a measurement: an early skirmisher starting red side. Take the void grubs and look for ganks while your early damage is ahead, then Herald and dragons.
Itens iniciais


Itens principais
- 1Cutelo Negro
- 2Quebra-Bastião
- 3Rancor de Serylda
Botas

Situacionais


Runas
Primária· Dominação






Secundária· Precisão


Fragmentos


Feitiços de invocador
 Flash
Flash Golpear
Defensive build
Quando usar
Keeps enough damage while adding magic resist, attack damage and life steal through Mercurial Scimitar, Maw of Malmortius and Death's Dance. Choose it against dive, assassins or a lane you can't win.

Por onde se joga
É escolhida antes da partida: primeiro a rota principal e depois as alternativas.
1100 %- SelvaPrincipal100 % das partidas
Prioridades na selva
Começa emBuff vermelho
Objetivos por prioridade
- 1Larvas do Vazio
- 2Gank no topo
- 3Arauto do Vale
- 4Caranguejo do rio
- 5Dragões
- 6Barão Nashor
- 7Atakhan
Guideline, not a measurement: an early skirmisher starting red side. Take the void grubs and look for ganks while your early damage is ahead, then Herald and dragons.
Itens iniciais
Itens principais
- 1Cimitarra Mercurial
- 2Mandíbula de Malmortius
- 3Dança da Morte
Botas

Situacionais


Runas
Primária· Precisão


Secundária· Determinação





Fragmentos
Feitiços de invocador
- Flash
- Golpear
Habilidades
 Maldição CarmesimPassivaOs Ataques e as Habilidades de Briar acumulam sangramento que cura Briar numa quantidade do dano causado. Constantemente faminta, ela ganha cura aumentada com base na Vida perdida, mas não tem Regeneração de Vida inata.Passive — heals. It works on its own: play around it.
 QVertigem13/12/11/10/9sBriar salta até uma unidade e atinge inimigos com um golpe giratório, atordoando e fragmentando a Armadura de todos que atingir.
- Tempo de recarga
- 13·12·11·10·9
- Alcance
- 475
 WFrenesi Sanguinário/Ataque Faminto14/13/12/11/10sBriar salta e quebra sua berlinda, entrando num Frenesi Sanguinário que faz com que ela persiga o inimigo mais próximo (priorizando Campeões). Enquanto estiver no Frenesi, ela ganha Velocidade de Ataque e Velocidade de Movimento aumentadas, e seus ataques causam dano em área perto do alvo. Briar pode reativar esta Habilidade enquanto estiver no Frenesi para dar uma MORDIDA no alvo no próximo ataqu
- Tempo de recarga
- 14·13·12·11·10
- Alcance
- 350
 EGrito Arrepiante16sBriar se concentra novamente, removendo Frenesi Sanguinário e canalizando sua energia em um grito poderoso que causa dano e Lentidão a inimigos. Ao carregar, ela recebe dano reduzido e se cura em uma parte de sua Vida máxima. Um grito totalmente carregado empurra inimigos, causando dano adicional e atordoando os que atingirem uma parede.
- Tempo de recarga
- 16
- Alcance
- 400
 RMorte CertaSuprema120/100/80sBriar lança o hemólito da berlinda dela, marcando o primeiro Campeão atingido como sua presa. Depois, ela avança diretamente, causando temor a inimigos próximos ao chegar no alvo e entrando num estado de hemomania total. Ela persegue a presa até a morte, recebendo os benefícios de Frenesi Sanguinário, além de Armadura, Resistência Mágica, Roubo de Vida e Velocidade de Movimento adicionais.
- Tempo de recarga
- 120·100·80
- Alcance
- 12000
Estratégia
1Early game
Start with your jungle pet and Smite, plan a full clear towards the lane you want to gank and show up when that lane has the enemy pushed and without Flash. A gank works when the lane is pushed towards the enemy tower and the enemy has used Flash or their escape: pick those moments instead of forcing a bad one.
- Early items: Phage and Kindlegem.


2Mid game
With Black Cleaver and Bastionbreaker, play around the next dragon or Baron: take vision with your laners first, then force the fight or trade the objective across the map. Your spikes are level 6, when Certain Death comes online, and each completed item: Black Cleaver first, then Bastionbreaker.
- Core items: Black Cleaver, Bastionbreaker and Serylda's Grudge.
3Late game
Late, Smite decides Baron and Elder: stay close to the pit when it's up and never get caught farming on the far side of the map before an objective spawns.
- Late items: Death's Dance and Mercurial Scimitar.
4Team fights
In fights, enter after the enemy uses their key crowd control and land Head Rush on the carry; keep Smite for the objective, not for damage. Use Certain Death where it hits the most enemies or catches the key target.
Dicas
- Rush Black Cleaver: it's the item that speeds up your clears and your ganks the most.
- Before an objective, reset and buy wards: fight it with full health and Smite ready.
- Gank the lane with crowd control: two stuns in a row are worth more than any damage.
- Plan fights around Certain Death: without it, Briar is far less threatening.
- Keep Head Rush for getting out, not for chasing.
Confrontos
Forte contra
Head Rush (stun) lets Briar pin Talon down before Noxian Diplomacy gets them out.
Head Rush (stun) lets Briar pin Gwen down before Skip 'n Slash gets them out.
Head Rush (stun) lets Briar pin Vi down before Vault Breaker gets them out.



Fraco contra
Allure (charm) lets Evelynn pin Briar down before Head Rush gets them out.
Royal Maelstrom (root) lets Bel'Veth pin Briar down before Head Rush gets them out.
Thundering Smash (stun) lets Volibear pin Briar down before Head Rush gets them out.




Mudanças
- Guide created for patch 16.19.1.
Ele te ajudou?
Seu voto ajuda outros jogadores a encontrar os melhores guias.