











Jayce · Jungle
Jayce Matchups and Counters
Mais guias de Jayce
Este guia é montado pelo site com dados de partidas e do próprio jogo: ninguém o escreveu à mão. Se houver guias oficiais ou da comunidade, eles aparecem ao lado.
Introdução
This guide covers Jayce's matchups and how to adapt to them. Riot publishes no matchup statistics, so the matchups below come from the champions' own stats and kits: attack range, starting durability, crowd control and mobility. They describe an advantage on paper, not a measured result.
Pontos fortes
- High physical damage: Riot rates it 8/10 in attack.
- Mobility: To the Skies! / Shock Blast lets you reposition, engage or escape.
- Clear job in the team: clear camps efficiently, gank the lanes that can win and control dragons, grubs and Baron.
Pontos fracos
- Falls behind if the early ganks fail: every wasted trip is lost farm.
- Predictable if you always play it the same way: adapt your build to the enemy team.
Cola de builds
Escolha a build de acordo com o que você quer fazer na partida.
- Against physical damageDefensivoRecomendadaFor a lane or a team that hits with attacks: armor boots and an armor item in the core.
- Against magic damageDefensivoSituacionalFor a team that kills with abilities: magic resist boots and a magic resist item in the core.
- Against healingDefensivoSituacionalFor games against healers, life steal or regeneration: the anti-heal item goes into the core instead of waiting.
Builds
Against physical damage
Quando usar
For a lane or a team that hits with attacks: armor boots and an armor item in the core.
Por onde se joga
É escolhida antes da partida: primeiro a rota principal e depois as alternativas.
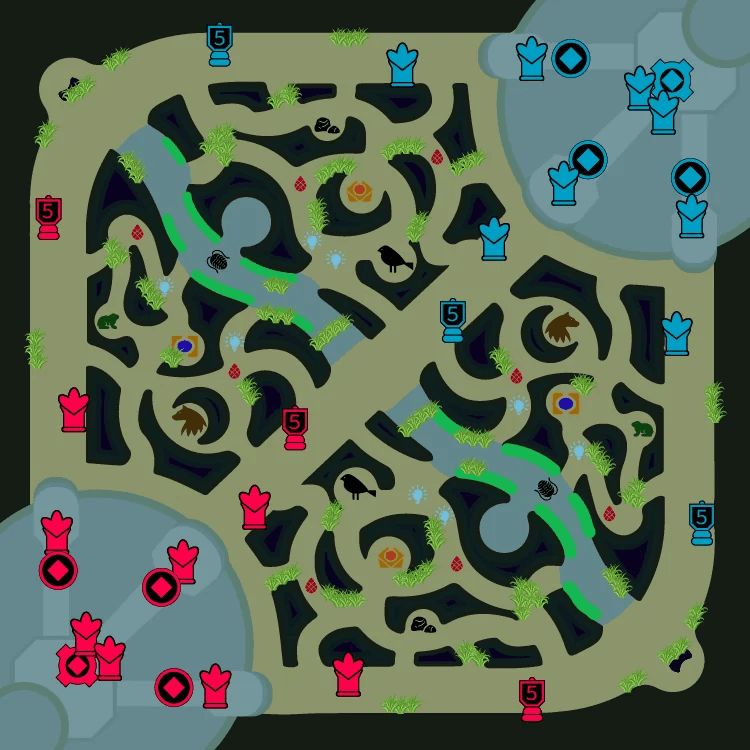
 3227 %173 %
- SelvaPrincipal73 % das partidas
- Rota SuperiorPrioridade 227 % das partidas
- MeioPrioridade 3
Prioridades na selva
Começa emBuff vermelho
Objetivos por prioridade
- 1Larvas do Vazio
- 2Gank no topo
- 3Arauto do Vale
- 4Caranguejo do rio
- 5Dragões
- 6Barão Nashor
- 7Atakhan
Guideline, not a measurement: an early skirmisher starting red side. Take the void grubs and look for ganks while your early damage is ahead, then Herald and dragons.
Itens iniciais


Itens principais
- 1Chuva de Canivete
- 2Flechatroz de Yun Tal
- 3Dança da Morte


Botas

Situacionais


Runas
Primária· Precisão







Secundária· Determinação





Fragmentos


Feitiços de invocador
 Flash
Flash Golpear
Against magic damage
Quando usar
For a team that kills with abilities: magic resist boots and a magic resist item in the core.
Por onde se joga
É escolhida antes da partida: primeiro a rota principal e depois as alternativas.
3227 %173 %- SelvaPrincipal73 % das partidas
- Rota SuperiorPrioridade 227 % das partidas
- MeioPrioridade 3
Prioridades na selva
Começa emBuff vermelho
Objetivos por prioridade
- 1Larvas do Vazio
- 2Gank no topo
- 3Arauto do Vale
- 4Caranguejo do rio
- 5Dragões
- 6Barão Nashor
- 7Atakhan
Guideline, not a measurement: an early skirmisher starting red side. Take the void grubs and look for ganks while your early damage is ahead, then Herald and dragons.
Itens iniciais
Itens principais
- 1Chuva de Canivete
- 2Flechatroz de Yun Tal
- 3Cimitarra Mercurial
Botas

Situacionais

Runas
Primária· Precisão
Secundária· Determinação
Fragmentos
Feitiços de invocador
- Flash
- Golpear
Against healing
Quando usar
For games against healers, life steal or regeneration: the anti-heal item goes into the core instead of waiting.
Por onde se joga
É escolhida antes da partida: primeiro a rota principal e depois as alternativas.
3227 %173 %- SelvaPrincipal73 % das partidas
- Rota SuperiorPrioridade 227 % das partidas
- MeioPrioridade 3
Prioridades na selva
Começa emBuff vermelho
Objetivos por prioridade
- 1Larvas do Vazio
- 2Gank no topo
- 3Arauto do Vale
- 4Caranguejo do rio
- 5Dragões
- 6Barão Nashor
- 7Atakhan
Guideline, not a measurement: an early skirmisher starting red side. Take the void grubs and look for ganks while your early damage is ahead, then Herald and dragons.
Itens iniciais
Itens principais
- 1Chuva de Canivete
- 2Flechatroz de Yun Tal
- 3Lembrete Mortal
Botas

Situacionais
Runas
Primária· Precisão
Secundária· Determinação
Fragmentos
Feitiços de invocador
- Flash
- Golpear
Habilidades
 Capacitor HextecPassivaQuando Jayce troca de arma, ele recebe Velocidade de Movimento por um curto período.
 QAos Céus! / Disparo Chocante16/14/12/10/8/6s40 mpEmpunhadura de Martelo: Salta na direção de um inimigo, causando Dano Físico e Lentidão. Empunhadura de Canhão: Dispara um orbe de eletricidade que detona ao atingir um inimigo (ou ao alcançar o fim de seu trajeto), causando Dano Físico a todos os inimigos atingidos.
- Tempo de recarga
- 16·14·12·10·8·6
- Custo
- 40
- Alcance
- 600
 WCampo Elétrico / Hipercarga10s40 mpEmpunhadura de Martelo: Passivo: Restaura Mana a cada acerto. Ativo: Cria um campo elétrico que causa dano a inimigos próximos por muitos segundos. Empunhadura de Canhão: Recebe um impulso de energia, aumentando a Velocidade de Ataque para seu máximo por diversos ataques.
- Tempo de recarga
- 10
- Custo
- 40
- Alcance
- 285
 EGolpe Trovejante / Portão Acelerador20/18/16/14/12/10s55 mpEmpunhadura de Martelo: causa Dano Mágico e empurra inimigos por uma curta distância. Empunhadura de Canhão: posiciona um Portão Acelerador que aumenta a Velocidade de Movimento dos Campeões aliados que o atravessarem. Se Disparo Chocante for usada através do portão, a velocidade, o alcance e o dano do projétil aumentarão.
- Tempo de recarga
- 20·18·16·14·12·10
- Custo
- 55
- Alcance
- 240
 RCanhão de Mercúrio / Martelo de MercúrioSuprema6sEmpunhadura de Martelo: Transforma o Martelo de Mercúrio em Canhão de Mercúrio, recebendo novas habilidades e ataques à distância. O primeiro ataque desta forma reduzirá a Armadura e a Resistência Mágica do alvo. Empunhadura de Canhão: Transforma o Canhão de Mercúrio em Martelo de Mercúrio, recebendo novas habilidades, aumentando a Resistência Mágica e a Armadura. O primeiro ataque desta forma cau
- Tempo de recarga
- 6
- Alcance
- 600
Estratégia
1Good matchups
Jayce does well against these:
- Kindred: To the Skies! / Shock Blast lets Jayce reach Kindred, who has no escape in the kit.
- Fiddlesticks: To the Skies! / Shock Blast lets Jayce reach Fiddlesticks, who has no escape in the kit.
- Evelynn: To the Skies! / Shock Blast lets Jayce reach Evelynn, who has no escape in the kit.


2Tough matchups
Jayce struggles against these:
- Elise: Cocoon / Rappel (stun) lets Elise pin Jayce down before To the Skies! / Shock Blast gets them out.
- Sejuani: Permafrost (stun) lets Sejuani pin Jayce down before To the Skies! / Shock Blast gets them out.
- Rengar: Bola Strike (root) lets Rengar pin Jayce down before To the Skies! / Shock Blast gets them out.



3Synergies
Jayce works well alongside these, because their kits fit together:
- Morgana: Black Shield from Morgana keeps Jayce alive, and Jayce is the damage the team needs to protect.
- Bard: Caretaker's Shrine from Bard keeps Jayce alive, and Jayce is the damage the team needs to protect.
- Yuumi: You and Me! from Yuumi keeps Jayce alive, and Jayce is the damage the team needs to protect.


4Adapting the build
The situational builds in this guide answer specific threats: Against physical damage, Against magic damage and Against healing.
5Playing against Jayce
If you're on the other side, this is what to exploit:
- Jayce can attack in melee or at range. Pay attention to his stance and weapon color to know how he is going to attack.
- If you see Jayce drop his Acceleration Gate, be careful, he is probably about to cast Shock Blast.
- Jayce is strong in the early game. If he gains the advantage, play defensively.
Dicas
- Look at the enemy team before choosing your build: the situational builds below answer the most common threats.
- Good matchup: Kindred. Play forward when you face them.
- Tough matchup: Elise. Play safer and wait for your team.
- Against teams with a lot of dive, save To the Skies! / Shock Blast for the first jump.
Confrontos
Forte contra
To the Skies! / Shock Blast lets Jayce reach Kindred, who has no escape in the kit.
To the Skies! / Shock Blast lets Jayce reach Fiddlesticks, who has no escape in the kit.
To the Skies! / Shock Blast lets Jayce reach Evelynn, who has no escape in the kit.
Fraco contra
Cocoon / Rappel (stun) lets Elise pin Jayce down before To the Skies! / Shock Blast gets them out.
Permafrost (stun) lets Sejuani pin Jayce down before To the Skies! / Shock Blast gets them out.
Bola Strike (root) lets Rengar pin Jayce down before To the Skies! / Shock Blast gets them out.
Combina bem com
Black Shield from Morgana keeps Jayce alive, and Jayce is the damage the team needs to protect.
Caretaker's Shrine from Bard keeps Jayce alive, and Jayce is the damage the team needs to protect.
You and Me! from Yuumi keeps Jayce alive, and Jayce is the damage the team needs to protect.
Mudanças
- Guide created for patch 16.19.1.
Ele te ajudou?
Seu voto ajuda outros jogadores a encontrar os melhores guias.