











Warwick · Jungle
Warwick Guide
Mais guias de Warwick
Este guia é montado pelo site com dados de partidas e do próprio jogo: ninguém o escreveu à mão. Se houver guias oficiais ou da comunidade, eles aparecem ao lado.
Introdução
Warwick belongs to Riot's Fighter and Tank classes and is played mainly as Jungle (100% of the public matches we measured). It fights in melee range and uses mana. In this guide you play it as Jungle: your job is to clear camps efficiently, gank the lanes that can win and control dragons, grubs and Baron. The kit brings crowd control (suppression) with Infinite Duress, mobility with Jaws of the Beast and sustain with Eternal Hunger. Its ultimate is Infinite Duress. Riot rates it 9/10 in attack, 3/10 in magic, 5/10 in defense and 3/10 in difficulty.
Pontos fortes
- High physical damage: Riot rates it 9/10 in attack.
- Crowd control: Infinite Duress applies a suppression to set up kills.
- Mobility: Jaws of the Beast lets you reposition, engage or escape.
- Sustain from Eternal Hunger.
Pontos fracos
- Falls behind if the early ganks fail: every wasted trip is lost farm.
- Predictable if you always play it the same way: adapt your build to the enemy team.
Cola de builds
Escolha a build de acordo com o que você quer fazer na partida.
- Standard buildEquilibradoRecomendadaThe default path: Black Cleaver, Trinity Force and Spear of Shojin give the health, attack damage and on-hit effects this class relies on. Pick it when you have no reason to adapt. Built from Riot's item tags and the champion's class; Riot publishes no build statistics.
- Lethality buildOfensivoAvançadaAll-in on damage: Terminus, Lord Dominik's Regards and Blade of The Ruined King stack attack damage, attack speed and on-hit effects. Choose it when you're ahead or the enemy team is fragile — it gives up safety for kill pressure.
- Defensive buildDefensivoSituacionalKeeps enough damage while adding health, magic resist and armor through Jak'Sho, The Protean, Bandlepipes and Zeke's Convergence. Choose it against dive, assassins or a lane you can't win.
Builds
Standard build
Quando usar
The default path: Black Cleaver, Trinity Force and Spear of Shojin give the health, attack damage and on-hit effects this class relies on. Pick it when you have no reason to adapt. Built from Riot's item tags and the champion's class; Riot publishes no build statistics.


Por onde se joga
É escolhida antes da partida: primeiro a rota principal e depois as alternativas.
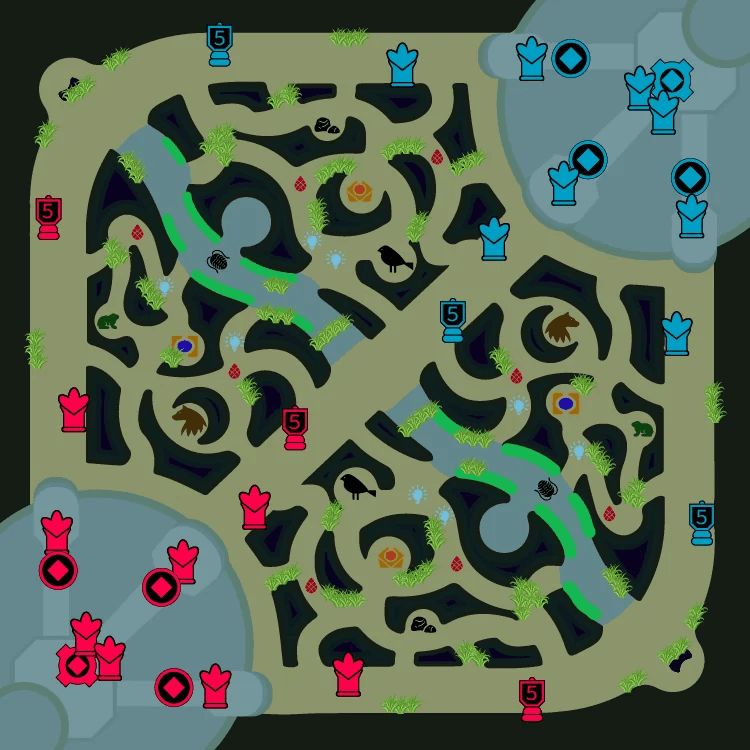
 21100 %
- SelvaPrincipal100 % das partidas
- Rota SuperiorPrioridade 2
Prioridades na selva
Começa emBuff vermelho
Objetivos por prioridade
- 1Larvas do Vazio
- 2Gank no topo
- 3Arauto do Vale
- 4Caranguejo do rio
- 5Dragões
- 6Barão Nashor
- 7Atakhan
Guideline, not a measurement: an early skirmisher starting red side. Take the void grubs and look for ganks while your early damage is ahead, then Herald and dragons.
Itens iniciais


Itens principais
- 1Cutelo Negro
- 2Força da Trindade
- 3Lança de Shojin
Botas

Situacionais


Runas
Primária· Precisão






Secundária· Determinação





Fragmentos


Feitiços de invocador
 Flash
Flash Golpear
Lethality build
Quando usar
All-in on damage: Terminus, Lord Dominik's Regards and Blade of The Ruined King stack attack damage, attack speed and on-hit effects. Choose it when you're ahead or the enemy team is fragile — it gives up safety for kill pressure.


Por onde se joga
É escolhida antes da partida: primeiro a rota principal e depois as alternativas.
21100 %- SelvaPrincipal100 % das partidas
- Rota SuperiorPrioridade 2
Prioridades na selva
Começa emBuff vermelho
Objetivos por prioridade
- 1Larvas do Vazio
- 2Gank no topo
- 3Arauto do Vale
- 4Caranguejo do rio
- 5Dragões
- 6Barão Nashor
- 7Atakhan
Guideline, not a measurement: an early skirmisher starting red side. Take the void grubs and look for ganks while your early damage is ahead, then Herald and dragons.
Itens iniciais
Itens principais
- 1Terminus
- 2Lembranças do Lorde Dominik
- 3Espada do Rei Destruído
Botas
Situacionais
Runas
Primária· Precisão
Secundária· Dominação



Fragmentos
Feitiços de invocador
- Flash
- Golpear
Defensive build
Quando usar
Keeps enough damage while adding health, magic resist and armor through Jak'Sho, The Protean, Bandlepipes and Zeke's Convergence. Choose it against dive, assassins or a lane you can't win.


Por onde se joga
É escolhida antes da partida: primeiro a rota principal e depois as alternativas.
21100 %- SelvaPrincipal100 % das partidas
- Rota SuperiorPrioridade 2
Prioridades na selva
Começa emBuff vermelho
Objetivos por prioridade
- 1Larvas do Vazio
- 2Gank no topo
- 3Arauto do Vale
- 4Caranguejo do rio
- 5Dragões
- 6Barão Nashor
- 7Atakhan
Guideline, not a measurement: an early skirmisher starting red side. Take the void grubs and look for ganks while your early damage is ahead, then Herald and dragons.
Itens iniciais
Itens principais
- 1Jak'Sho, o Inconstante
- 2Bandocanos
- 3Convergência de Zeke
Botas

Situacionais
Runas
Primária· Determinação


Secundária· Precisão
Fragmentos
Feitiços de invocador
- Flash
- Golpear
Habilidades
 Fome EternaPassivaOs ataques básicos de Warwick causam Dano Mágico adicional. Se ele estiver com menos de 50% de Vida, cura a si mesmo com a mesma quantia. Se ele estiver com menos de 25% de Vida, a cura é triplicada.Passive — heals. It works on its own: play around it.
 QPresas da Fera8/7.5/7/6.5/6s80/85/90/95/100 mpWarwick lança-se à frente e morde seu alvo, causando dano com base em sua Vida máxima e curando a si mesmo com o dano causado.
- Tempo de recarga
- 8·7.5·7·6.5·6
- Custo
- 80·85·90·95·100
- Alcance
- 365
 WCaçada Sangrenta80/70/60/50/40s55 mpWarwick detecta inimigos com menos de 50% de Vida, recebendo Velocidade de Movimento ao deslocar-se na direção deles e Velocidade de Ataque ao atacá-los. Quando eles ficarem com menos de 25% de Vida, Warwick entrará em frenesi e esses efeitos triplicarão.
- Tempo de recarga
- 80·70·60·50·40
- Custo
- 55
- Alcance
- 4000
 EUivo Primitivo15/14/13/12/11s40 mpWarwick recebe redução de dano por 2,5 segundos. Ao fim do efeito, ou caso seja reativado, ele uiva, fazendo com que inimigos próximos fujam por 1 segundo.
- Tempo de recarga
- 15·14·13·12·11
- Custo
- 40
- Alcance
- 375
 RCoerção InfinitaSuprema110/90/70s100 mpWarwick salta em uma direção (escalando com a Velocidade de Movimento adicional dele), suprimindo o primeiro Campeão atingido por 1,5s.
- Tempo de recarga
- 110·90·70
- Custo
- 100
- Alcance
- 25000
Estratégia
1Early game
Start with your jungle pet and Smite, plan a full clear towards the lane you want to gank and show up when that lane has the enemy pushed and without Flash. A gank works when the lane is pushed towards the enemy tower and the enemy has used Flash or their escape: pick those moments instead of forcing a bad one.
- Early items: Phage and Kindlegem.


2Mid game
With Black Cleaver and Trinity Force, play around the next dragon or Baron: take vision with your laners first, then force the fight or trade the objective across the map. Your spikes are level 6, when Infinite Duress comes online, and each completed item: Black Cleaver first, then Trinity Force.
- Core items: Black Cleaver, Trinity Force and Spear of Shojin.
3Late game
Late, Smite decides Baron and Elder: stay close to the pit when it's up and never get caught farming on the far side of the map before an objective spawns.
- Late items: Death's Dance and Mercurial Scimitar.
4Team fights
In fights, enter after the enemy uses their key crowd control and land Infinite Duress on the carry; keep Smite for the objective, not for damage.
5Playing against Warwick
Riot's own advice for facing this champion:
- Warwick's attacks heal him at low health. Save your disables to finish him off.
- Warwick is empowered versus low health enemies. Manage your health to keep him at bay.
- Warwick's ultimate cast range scales with his Move Speed.
Dicas
- Follow your Blood Hunt trails to low health enemy champions.
- Infinite Duress (R)'s distance scales with any Move Speed you gain, even from ally buffs and summoner spells.
- Jaws of the Beast (Q) will follow enemies who run, dash or teleport if you keep the button held down.
- Rush Black Cleaver: it's the item that speeds up your clears and your ganks the most.
- Before an objective, reset and buy wards: fight it with full health and Smite ready.
- Gank the lane with crowd control: two stuns in a row are worth more than any damage.
Confrontos
Forte contra
Briar looks for fragile targets to jump on; Warwick is built to take hits and makes that dive costly.
Talon looks for fragile targets to jump on; Warwick is built to take hits and makes that dive costly.
Kha'Zix looks for fragile targets to jump on; Warwick is built to take hits and makes that dive costly.


Fraco contra
Warwick has to walk up to start a fight, and Terrify (fear) stops that engage before it lands.
Warwick has to walk up to start a fight, and Jack In The Box (fear) stops that engage before it lands.
Warwick has to walk up to start a fight, and Royal Maelstrom (root) stops that engage before it lands.

Combina bem com
Warwick holds the front line while Varus deals damage from behind.
Warwick holds the front line while Twisted Fate deals damage from behind.
Warwick holds the front line while Ashe deals damage from behind.


Mudanças
- Guide created for patch 16.19.1.
Ele te ajudou?
Seu voto ajuda outros jogadores a encontrar os melhores guias.