











Aurora · Mid
Aurora Laning Guide
Mais guias de Aurora
Este guia é montado pelo site com dados de partidas e do próprio jogo: ninguém o escreveu à mão. Se houver guias oficiais ou da comunidade, eles aparecem ao lado.
Introdução
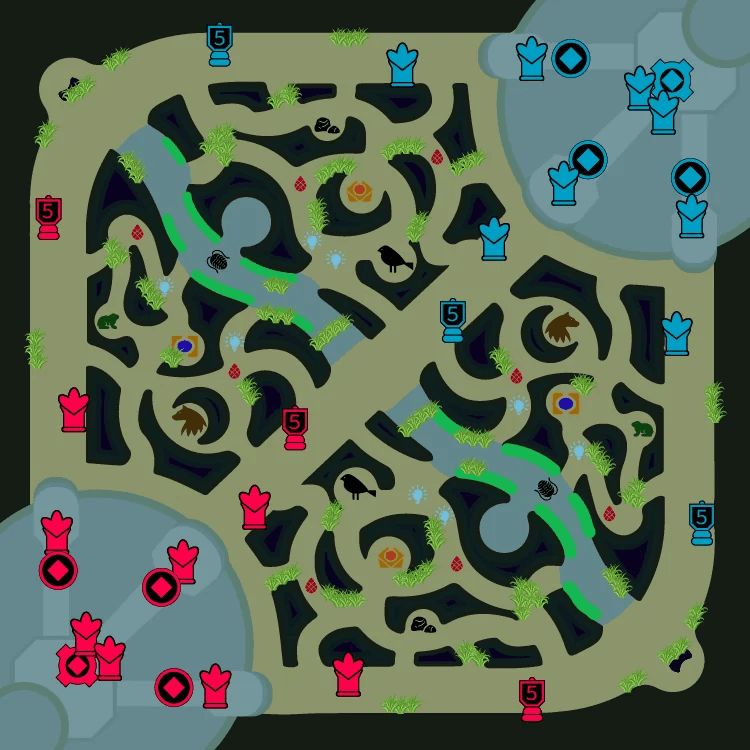
Mid is the shortest lane: trades are fast and the enemy jungler is always close. Push the wave when you can, so you are first to the river when a skirmish starts. Early, prioritise the river: being first to a skirmish or to the first dragon is worth more than a few extra minions.
Pontos fortes
- Sustain from Spirit Abjuration.
- Long attack range (550) for safe trades in lane.
- High magic damage: Riot rates it 8/10 in magic.
Pontos fracos
- Mana-hungry early: spamming abilities leaves you empty before the fight.
- The enemy jungle and supports will target you for ganks.
Cola de builds
Escolha a build de acordo com o que você quer fazer na partida.
- Lane buildEquilibradoRecomendadaHow to open: starting items, then the components of Cryptbloom on your first backs, and boots when the lane allows.
- Standard buildEquilibradoAvançadaThe default path: Cryptbloom, Archangel's Staff and Blackfire Torch give the ability power, magic penetration and ability haste this class relies on. Pick it when you have no reason to adapt. Built from Riot's item tags and the champion's class; Riot publishes no build statistics.
Builds
Lane build
Quando usar
How to open: starting items, then the components of Cryptbloom on your first backs, and boots when the lane allows.

Por onde se joga
É escolhida antes da partida: primeiro a rota principal e depois as alternativas.
 21100 %
- MeioPrincipal100 % das partidas
- Rota SuperiorPrioridade 2
Itens iniciais


Primeiros itens


Itens principais
- 1Criptoflora
Botas

Runas
Primária· Feitiçaria











Secundária· Inspiração





Fragmentos


Feitiços de invocador
 Flash
Flash Incendiar
Standard build
Quando usar
The default path: Cryptbloom, Archangel's Staff and Blackfire Torch give the ability power, magic penetration and ability haste this class relies on. Pick it when you have no reason to adapt. Built from Riot's item tags and the champion's class; Riot publishes no build statistics.


Por onde se joga
É escolhida antes da partida: primeiro a rota principal e depois as alternativas.
21100 %- MeioPrincipal100 % das partidas
- Rota SuperiorPrioridade 2
Itens iniciais
Itens principais
- 1Criptoflora
- 2Cajado do Arcanjo
- 3Tocha de Chamas Negras
Botas
Situacionais


Runas
Primária· Feitiçaria
Secundária· Inspiração
Fragmentos
Feitiços de invocador
- Flash
- Incendiar
Habilidades
 Abjuração EspiritualPassivaAs Habilidades e Ataques da Aurora exorcizam espíritos dos inimigos aos quais ela causar dano. Espíritos exorcizados seguem e curam Aurora.
 QFeitiço Dúplice9/8.5/8/7.5/7s60 mpAurora envia um projétil que amaldiçoa qualquer inimigo que atingir. Ela pode reconjurar a Habilidade para puxar de volta as maldições ativas na direção dela, causando dano a inimigos atingidos no caminho.
- Tempo de recarga
- 9·8.5·8·7.5·7
- Custo
- 60
- Alcance
- 900
 WAtravés do Véu22/21/20/19/18s80 mpAurora salta em uma direção escolhida, entrando no reino espiritual ao aterrissar, ficando invisível e recebendo Velocidade de Movimento por um breve período.
- Tempo de recarga
- 22·21·20·19·18
- Custo
- 80
- Alcance
- 700
 EEstranheza15/14/13/12/11s80 mpAurora converge os reinos, lançando uma explosão de magia espiritual que causa dano e Lentidão a inimigos antes que ela salte de volta em segurança.
- Tempo de recarga
- 15·14·13·12·11
- Custo
- 80
- Alcance
- 825
 REntre MundosSuprema140/120/100s100 mpAurora salta em uma direção escolhida, liberando uma onda de choque que causa dano e Lentidão a inimigos atingidos. Depois, Aurora cria uma área que causa Lentidão a inimigos, permitindo que ela se teleporte de um lado a outro da área.
- Tempo de recarga
- 140·120·100
- Custo
- 100
- Alcance
- 250
Estratégia
1Starting and early items
The first items decide how comfortable the lane is. The lane build below lists them with what each one gives you.
- Key early items: Blighting Jewel and Fiendish Codex.
2Trading
Trade when the enemy uses an ability on the wave: that's the moment they can't answer. The kit brings mobility with Across the Veil and sustain with Spirit Abjuration.
3Wave management
Freeze the wave near your tower when you're weaker, slow push before a back and crash the wave when you want to roam or take a plate.
4Early objectives
Early, prioritise the river: being first to a skirmish or to the first dragon is worth more than a few extra minions. Your spikes are level 6, when Between Worlds comes online, and each completed item: Cryptbloom first, then Archangel's Staff.
Dicas
- Trade when the enemy uses an ability on the wave: that's the moment they can't answer.
- Blighting Jewel is your first purchase that changes the lane: get it early.
- Keep Across the Veil ready when the enemy's gankers are missing.
- Early, prioritise the river: being first to a skirmish or to the first dragon is worth more than a few extra minions.
Confrontos
Forte contra
Aurora attacks from 550 units and Akali from 125: every trade in lane happens at a distance they cannot answer.
Aurora attacks from 550 units and Katarina from 125: every trade in lane happens at a distance they cannot answer.
Aurora attacks from 550 units and Locke from 125: every trade in lane happens at a distance they cannot answer.



Fraco contra
Falling Star / The Skies Descend (stun) lets Aurelion Sol pin Aurora down before Across the Veil gets them out.
Charm (charm) lets Ahri pin Aurora down before Across the Veil gets them out.
Steel Tempest (knock-up) lets Yasuo pin Aurora down before Across the Veil gets them out.



Mudanças
- Guide created for patch 16.19.1.
Ele te ajudou?
Seu voto ajuda outros jogadores a encontrar os melhores guias.